Learn how to use Model Assistant, Models, and Playground to select models, review model details, and test responses before integrating the Model Inference API.
Before you write integration code, you can use the console to get model recommendations, narrow down the catalog, and test model behavior.
Describe your task in Model Assistant on the Home page to get model and configuration suggestions.
Browse and compare models on the Models page, then review model details.
If you are not sure which model to start with, describe your task in Model Assistant on the Home page. Model Assistant recommends suitable models and configuration suggestions based on your goal, and asks follow-up questions when more constraints are needed. You can also start from common scenarios such as document summarization, coding assistance, and text classification.Open the Models page to filter models by organization, category, context window, price, and other dimensions.On each model card, you can review key information such as model name, context window, and price. Open View Details to get additional information, including invocation examples.
The platform provides copy-ready curl and Python examples to help you call models quickly. When calling the API, use the model name exactly as shown on the model details page.
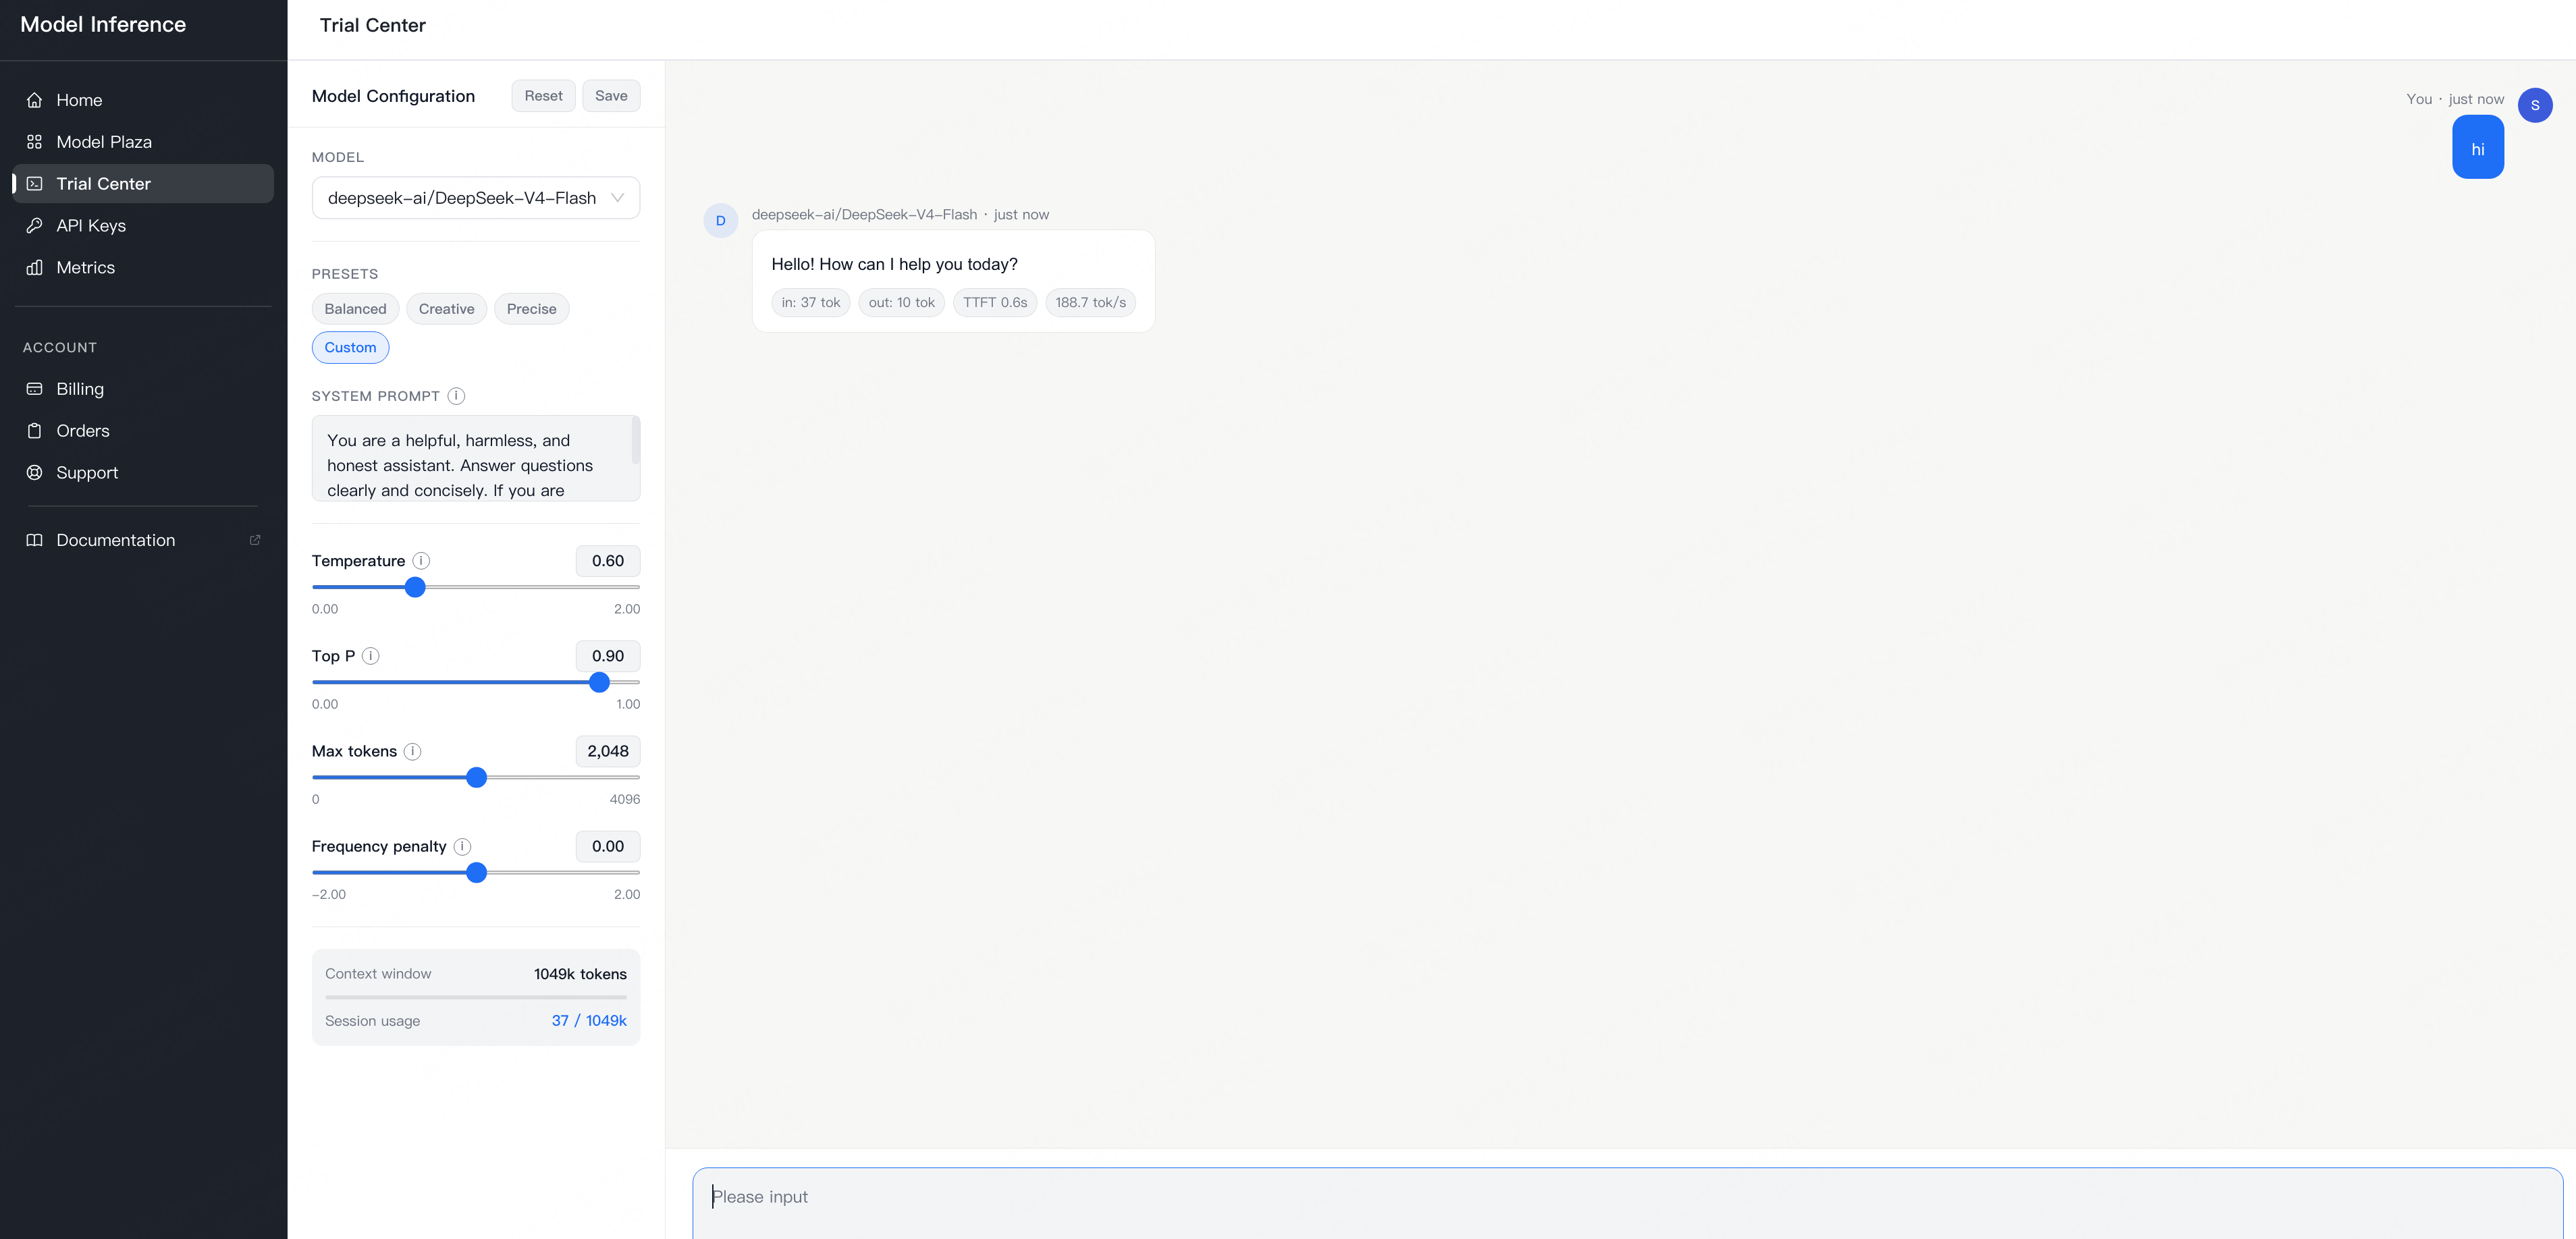
On a model card, choose Try Now to open Playground with the selected model. You can enter prompts directly, observe responses, and compare parameter behavior before integrating the model into your application.
Some model categories, such as embedding models, are not supported in Playground. Call them through the API instead.
In Playground, you can:
Switch models from the model selector.
Pick a preset, such as Balanced, Creative, or Precise, or use a custom configuration.
Use a system prompt to set the assistant’s role, tone, or constraints.
Tune parameters such as Temperature, Top P, Top K, Max tokens, and Frequency penalty.
View the context window and current session usage.
Reset or save the current configuration as needed.
In Playground, Max tokens corresponds to the API parameter max_completion_tokens. For reasoning models, it limits the combined total of reasoning tokens and visible output tokens. For details, see Token Usage and Billing.
Parameters a model does not support are disabled automatically, so only valid settings are sent. Each user’s configuration is saved per model.
On the Home page, you can view usage overview data, including token consumption, API requests, throughput trends, Top Models, Top API Keys, and member usage, to quickly understand the main sources of traffic. Member usage is visible only to administrators.To inspect request details and aggregated metrics, see View Usage and View Metrics.
Once the model and parameters are confirmed, create an API key and call the model from your application.
{"docsConfig":{"theme":"mint","$schema":"https://mintlify.com/docs.json","name":"ScitiX","description":"ScitiX documentation provides guides for Model Inference, GPU Cloud, and account management, helping developers connect to model APIs, manage GPU resources, and configure accounts and billing.","colors":{"primary":"#3B82F6","light":"#3B82F6","dark":"#3B82F6"},"logo":{"light":"https://mintcdn.com/scitix-adfc65c2/UDvmXctEfVsXWOHh/logo/logo.png?fit=max\u0026auto=format\u0026n=UDvmXctEfVsXWOHh\u0026q=85\u0026s=277f160d7ff5cbfac6e30e6e62d69f9f","dark":"https://mintcdn.com/scitix-adfc65c2/UDvmXctEfVsXWOHh/logo/logo-dark.png?fit=max\u0026auto=format\u0026n=UDvmXctEfVsXWOHh\u0026q=85\u0026s=ff7f91e1c8e024423828b82b08fab3db","href":"/model-inference/get-started/model-inference-overview"},"favicon":"https://mintcdn.com/scitix-adfc65c2/N8zy-cNK0Mq2aeoL/logo/favicon.ico?fit=max\u0026auto=format\u0026n=N8zy-cNK0Mq2aeoL\u0026q=85\u0026s=c8960a64824d3f60efabcd1d721be709","navbar":{"links":[{"href":"https://scitix.ai/","label":"Website"}],"primary":{"type":"button","label":"Console","href":"https://console.scitix.ai/"}},"footer":{},"seo":{"metatags":{"og:site_name":"ScitiX Documentation","og:url":"https://docs.scitix.ai","twitter:card":"summary_large_image"},"organization":{"name":"ScitiX","url":"https://scitix.ai/"},"indexing":"navigable"},"styling":{"eyebrows":"breadcrumbs","latex":false},"errors":{"404":{"redirect":false,"title":"Page not found","description":"The page you are looking for may have moved, been renamed, or no longer be published. Use the search bar above, or continue from one of these entry points:\n\n- [Model Inference](/model-inference/get-started/model-inference-overview)\n- [GPU Cloud](/gpu-cloud/get-started/gpu-cloud-overview)\n- [Connect Docs to AI](/model-inference/get-started/connect-docs-to-ai)"}},"contextual":{"options":["copy","view","chatgpt","claude","perplexity","mcp","cursor","vscode","windsurf"],"display":"header"},"navigation":{"pages":[]}},"deployment":{"deploymentMetadataValue":{"subdomain":"scitix-adfc65c2","hasAudioNarration":false,"actualSubdomain":"scitix-adfc65c2","customDomains":["docs.scitix.ai"],"gitSource":{"type":"github","owner":"scitix","repo":"mintlify-docs","deployBranch":"main","contentDirectory":"","isPrivate":true,"mountPath":"","label":""},"chroma":{"collectionId":"38c7ac4a-ba4f-4fac-ab43-bc1ea28c61f1","liveDeploymentHistoryId":"6ad5b291308337059e856144","schemaVersion":"v3","latestBuiltDeploymentHistoryId":"6ad5b291308337059e856144"},"entitlements":{},"buildId":"6ad5b291308337059e856144","clientVersion":"0.0.3933","searchFilterCounts":[{"language":"default","tag":"Model Inference","count":72},{"language":"default","tag":"Tool Integrations","count":51},{"language":"default","tag":"GPU Cloud","count":33},{"language":"default","tag":"Clusters","count":12},{"language":"default","tag":"Frameworks \u0026 SDKs","count":10},{"language":"default","tag":"Models","count":10},{"language":"default","tag":"Account","count":9},{"language":"default","tag":"Coding Agents","count":9},{"language":"default","tag":"Get Started","count":8},{"language":"default","tag":"Workflow \u0026 App Platforms","count":8}]},"assistantConfig":{"enableAskAiButton":false,"enableStarterQuestions":false,"enableContextualStarterQuestions":false,"enableAskAiSearchBar":true},"hasChatPermissions":false,"hasWebMcpPermissions":false,"toggles":[{"name":"kill-isr","enabled":true,"variant":{"name":"disabled","enabled":false,"feature_enabled":true},"impressionData":false},{"name":"agent-mintlify-slack","enabled":true,"variant":{"name":"disabled","enabled":false,"feature_enabled":true},"impressionData":false},{"name":"editor-v7-file-tree","enabled":true,"variant":{"name":"disabled","enabled":false,"feature_enabled":true},"impressionData":false},{"name":"agent-integrations-settings","enabled":true,"variant":{"name":"disabled","enabled":false,"feature_enabled":true},"impressionData":false},{"name":"automations-pr-grouping","enabled":true,"variant":{"name":"disabled","enabled":false,"feature_enabled":true},"impressionData":false},{"name":"custom-prefix","enabled":true,"variant":{"name":"disabled","enabled":false,"feature_enabled":true},"impressionData":false},{"name":"analytics-v7","enabled":true,"variant":{"name":"disabled","enabled":false,"feature_enabled":true},"impressionData":false},{"name":"user-flows-analytics","enabled":true,"variant":{"name":"disabled","enabled":false,"feature_enabled":true},"impressionData":false},{"name":"no-publish-flow","enabled":true,"variant":{"name":"disabled","enabled":false,"feature_enabled":true},"impressionData":false},{"name":"workos-onboarding","enabled":true,"variant":{"name":"disabled","enabled":false,"feature_enabled":true},"impressionData":false},{"name":"llms-txt-v2","enabled":true,"variant":{"name":"disabled","enabled":false,"feature_enabled":true},"impressionData":false},{"name":"pause-universal-search-reconcile","enabled":true,"variant":{"name":"disabled","enabled":false,"feature_enabled":true},"impressionData":false},{"name":"snapshot-serving-live","enabled":true,"variant":{"name":"disabled","enabled":false,"feature_enabled":true},"impressionData":false},{"name":"stripTemperatureMiddleware","enabled":true,"variant":{"name":"disabled","enabled":false,"feature_enabled":true},"impressionData":false},{"name":"per-site-search-delta","enabled":true,"variant":{"name":"disabled","enabled":false,"feature_enabled":true},"impressionData":false},{"name":"support-platform-pylon-zendesk","enabled":true,"variant":{"name":"disabled","enabled":false,"feature_enabled":true},"impressionData":false},{"name":"snapshot-serving","enabled":true,"variant":{"name":"disabled","enabled":false,"feature_enabled":true},"impressionData":false},{"name":"instant-rollback","enabled":true,"variant":{"name":"disabled","enabled":false,"feature_enabled":true},"impressionData":false},{"name":"granular-notifications-server","enabled":true,"variant":{"name":"disabled","enabled":false,"feature_enabled":true},"impressionData":false},{"name":"granular-notifications","enabled":true,"variant":{"name":"disabled","enabled":false,"feature_enabled":true},"impressionData":false},{"name":"editor-private-page-search","enabled":true,"variant":{"name":"disabled","enabled":false,"feature_enabled":true},"impressionData":false},{"name":"automations-fable","enabled":true,"variant":{"name":"disabled","enabled":false,"feature_enabled":true},"impressionData":false},{"name":"fixed-ai-action-pricing","enabled":true,"variant":{"name":"disabled","enabled":false,"feature_enabled":true},"impressionData":false},{"name":"automation-resolve-merge-conflict","enabled":true,"variant":{"name":"disabled","enabled":false,"feature_enabled":true},"impressionData":false},{"name":"scoped-publishing","enabled":true,"variant":{"name":"disabled","enabled":false,"feature_enabled":true},"impressionData":false},{"name":"mintql","enabled":true,"variant":{"name":"disabled","enabled":false,"feature_enabled":true},"impressionData":false},{"name":"page-level-analytics","enabled":true,"variant":{"name":"disabled","enabled":false,"feature_enabled":true},"impressionData":false},{"name":"editor-version-history-v2","enabled":true,"variant":{"name":"disabled","enabled":false,"feature_enabled":true},"impressionData":false},{"name":"editor-nav-generations","enabled":true,"variant":{"name":"disabled","enabled":false,"feature_enabled":true},"impressionData":false},{"name":"billing-page-v2","enabled":true,"variant":{"name":"disabled","enabled":false,"feature_enabled":true},"impressionData":false},{"name":"vite-origin","enabled":true,"variant":{"name":"disabled","enabled":false,"feature_enabled":true},"impressionData":false},{"name":"workspace-projects","enabled":true,"variant":{"name":"disabled","enabled":false,"feature_enabled":true},"impressionData":false},{"name":"assistant-v5","enabled":true,"variant":{"name":"disabled","enabled":false,"feature_enabled":true},"impressionData":false},{"name":"byok-sep-25","enabled":true,"variant":{"name":"disabled","enabled":false,"feature_enabled":true},"impressionData":false},{"name":"fork-pr-previews","enabled":true,"variant":{"name":"disabled","enabled":false,"feature_enabled":true},"impressionData":false},{"name":"revalidation-jwt","enabled":true,"variant":{"name":"disabled","enabled":false,"feature_enabled":true},"impressionData":false},{"name":"editor-agent-model-picker","enabled":true,"variant":{"name":"disabled","enabled":false,"feature_enabled":true},"impressionData":false},{"name":"billing-updated-9-15","enabled":true,"variant":{"name":"disabled","enabled":false,"feature_enabled":true},"impressionData":false},{"name":"hobby-abuse-scan","enabled":true,"variant":{"name":"disabled","enabled":false,"feature_enabled":true},"impressionData":false},{"name":"dashboard-inbox","enabled":true,"variant":{"name":"disabled","enabled":false,"feature_enabled":true},"impressionData":false}],"isAtlas":false,"googleFontsInlined":false},"customCss":[{"filePath":"styles.css","content":"#ask-assistant-code-block-button,#assistant-entry,#assistant-entry-mobile,#chat-assistant-sheet,#header>.mt-2.text-lg.prose,#text-selection-tooltip-button,.chat-assistant-floating-input,.chat-assistant-sheet,a[href*=\"utm_campaign=poweredBy\"],button[data-component-part=search-ask-ai-button]{display:none!important}a[href=\"/help/use-docs-with-ai\"],a[href=\"/help/use-docs-with-ai/\"]{color:rgb(55 65 81)!important}a[href=\"/help/use-docs-with-ai\"] .icon,a[href=\"/help/use-docs-with-ai\"] svg,a[href=\"/help/use-docs-with-ai/\"] .icon,a[href=\"/help/use-docs-with-ai/\"] svg{background-color:rgb(59 130 246)!important;color:rgb(59 130 246)!important;stroke:rgb(59 130 246)!important;fill:none!important}a[href=\"/help/use-docs-with-ai\"] svg *,a[href=\"/help/use-docs-with-ai/\"] svg *{background-color:rgb(59 130 246)!important;color:rgb(59 130 246)!important;stroke:rgb(59 130 246)!important}.dark a[href=\"/help/use-docs-with-ai\"]:hover,.dark a[href=\"/help/use-docs-with-ai/\"]:hover,a[href=\"/help/use-docs-with-ai\"]:hover,a[href=\"/help/use-docs-with-ai/\"]:hover{color:rgb(59 130 246)!important}.dark a[href=\"/help/use-docs-with-ai\"],.dark a[href=\"/help/use-docs-with-ai/\"]{color:rgb(229 231 235)!important}[data-component-part=search-list]>div[role=group]:has([data-component-part=search-ask-ai-item]),body:has(.docs-home) #navbar div:has(>.nav-tabs),body:has(.docs-home) .nav-tabs-item[data-active=true]::after,div:has(>#chat-assistant-sheet){display:none!important}body:has(.docs-home) .nav-tabs-item[data-active=true]{color:inherit!important;text-shadow:none!important}.nav-tabs .nav-tabs-item:nth-child(3){margin-left:3rem;position:relative}.nav-tabs .nav-tabs-item:nth-child(3)::before{content:\"\";position:absolute;left:-2rem;top:50%;width:1px;height:1rem;background:rgb(209 213 219);transform:translateY(-50%)}.dark .nav-tabs .nav-tabs-item:nth-child(3)::before{background:rgb(75 85 99)}.docs-home{--home-border:rgb(229 231 235);--home-muted:rgb(75 85 99);--home-panel:rgb(255 255 255)}.docs-home-hero{border-bottom:1px solid var(--home-border);padding-bottom:1.125rem}.docs-home-kicker{letter-spacing:0}.docs-products-panel,.docs-support-panel{border:1px solid var(--home-border);border-radius:.75rem;background:linear-gradient(180deg,rgb(249 250 251),rgb(255 255 255));padding:.75rem}@media (min-width:768px){.docs-products-panel,.docs-support-panel{padding:.875rem}}.docs-account-panel,.docs-product-card{position:relative;overflow:hidden;transition:border-color 160ms ease,box-shadow 160ms ease,transform 160ms ease}.docs-product-card{--product-accent:#3b82f6;--product-tint:rgb(59 130 246 / 0.08);min-height:100%;border-top-color:var(--product-accent)!important;border-top-style:solid!important;border-top-width:3px!important;cursor:pointer}.docs-card-link{position:absolute;inset:0;z-index:1;border-radius:inherit}.docs-product-card .docs-path-link,.docs-product-card .docs-title-link{position:relative;z-index:2}.docs-account-panel:hover,.docs-product-card:hover{border-color:var(--product-accent, #3b82f6);box-shadow:0 14px 32px rgb(15 23 42/.08);transform:translateY(-1px)}.docs-account-panel:hover{box-shadow:0 8px 18px rgb(15 23 42/.05);transform:none}.docs-product-header{display:flex;align-items:center;gap:.75rem}.docs-account-icon,.docs-product-icon{display:inline-flex;width:2.125rem;height:2.125rem;flex:0 0 auto;align-items:center;justify-content:center;border:1px solid rgb(229 231 235);border-radius:.5rem;background:var(--product-tint, rgb(59 130 246 / 0.08));color:var(--product-accent, #3b82f6)}.docs-account-icon svg,.docs-product-icon svg{width:1rem;height:1rem}.docs-account-icon svg.icon,.docs-product-icon svg.icon{background-color:var(--product-accent, #3b82f6)!important}.docs-path-link,.docs-title-link{align-items:center;text-decoration:none}.docs-title-link{display:inline-flex;gap:.4rem;color:rgb(17 24 39);font-size:1.125rem;font-weight:650;line-height:1.3}.docs-title-link:hover{color:var(--product-accent, #3b82f6)}.docs-path-link{display:grid;grid-template-columns:auto 1fr auto;gap:.65rem;border:1px solid transparent;border-radius:.5rem;color:rgb(55 65 81);transition:background 160ms ease,border-color 160ms ease,color 160ms ease;padding:.33rem .5rem}.docs-path-link:hover,.docs-support-link:hover{border-color:var(--product-accent, #3b82f6);background:var(--product-tint, rgb(249 250 251));color:var(--product-accent, #3b82f6)}.docs-step{display:inline-flex;width:1.3rem;height:1.3rem;align-items:center;justify-content:center;border-radius:999px;background:var(--product-tint, rgb(59 130 246 / 0.08));color:var(--product-accent, #3b82f6);font-size:.75rem;font-weight:650}.docs-path-arrow{color:rgb(156 163 175);transition:color 160ms ease,transform 160ms ease}.docs-path-link:hover .docs-path-arrow,.docs-support-link:hover .docs-path-arrow{color:var(--product-accent, #3b82f6);transform:translateX(.125rem)}.docs-support-link{display:flex;align-items:center;justify-content:center;padding:.62rem .8rem;border:1px solid transparent;border-radius:.5rem;background:var(--home-panel);color:rgb(55 65 81);font-size:.875rem;font-weight:600;text-align:center;text-decoration:none;transition:background 160ms ease,border-color 160ms ease,color 160ms ease}.dark .docs-home{--home-border:rgb(31 41 55);--home-muted:rgb(156 163 175);--home-panel:rgb(3 7 18)}.dark .docs-products-panel,.dark .docs-support-panel{background:linear-gradient(180deg,rgb(17 24 39/.55),rgb(3 7 18/.78))}.dark .docs-account-panel:hover,.dark .docs-product-card:hover{border-color:var(--product-accent, #60a5fa);box-shadow:0 14px 32px rgb(0 0 0/.22)}.dark .docs-account-panel:hover{box-shadow:0 8px 18px rgb(0 0 0/.14)}.dark .docs-account-icon,.dark .docs-product-icon{border-color:rgb(55 65 81)}.dark .docs-title-link{color:rgb(255 255 255)}.dark .docs-path-link:hover,.dark .docs-support-link:hover,.dark .docs-title-link:hover{color:var(--product-accent, #60a5fa)}.dark .docs-path-link,.dark .docs-support-link{color:rgb(209 213 219)}.dark .docs-path-link:hover,.dark .docs-support-link:hover{border-color:var(--product-accent, #60a5fa);background:var(--product-tint, rgb(17 24 39))}#sidebar #navigation-items>div+div{margin-top:1.125rem!important}#sidebar .sidebar-group-header{margin-bottom:.375rem!important}#sidebar .sidebar-group>li>a,#sidebar .sidebar-group>li>button{padding-top:.25rem!important;padding-bottom:.25rem!important}@media (min-width:1280px){#sidebar{width:20%!important;margin-right:3%!important}#content-container>div:has(>#content-area){gap:3.8961%!important}#content-side-layout{flex:0 0 18.1818%!important;width:18.1818%!important;max-width:none!important;min-width:0!important}#table-of-contents-layout{width:100%!important;min-width:0!important;padding-left:1rem!important}#table-of-contents{width:100%!important}#table-of-contents,#table-of-contents [data-component-part=scroll-area-content]{min-width:0!important}#table-of-contents-content a{white-space:normal;overflow-wrap:anywhere}#content-area{flex:0 0 77.9221%!important;width:77.9221%!important;margin-left:0!important;padding-left:0!important}}"}],"page":{"pagePath":"model-inference/get-started/model-selection-playground","slug":"/model-inference/get-started/model-selection-playground","pageMetadata":{"title":"Model Selection \u0026 Playground","description":"Learn how to use Model Assistant, Models, and Playground to select models, review model details, and test responses before integrating the Model Inference API.","keywords":"Model Assistant, ScitiX Models, model selection, model playground, Model Inference, test AI models","sidebarTitle":"Model Selection \u0026 Playground","href":"/model-inference/get-started/model-selection-playground"},"description":{"compiledSource":"\"use strict\";\nconst {jsx: _jsx} = arguments[0];\nconst {useMDXComponents: _provideComponents} = arguments[0];\nfunction _createMdxContent(props) {\n const _components = {\n p: \"p\",\n ..._provideComponents(),\n ...props.components\n };\n return _jsx(_components.p, {\n children: \"Learn how to use Model Assistant, Models, and Playground to select models, review model details, and test responses before integrating the Model Inference API.\"\n });\n}\nfunction MDXContent(props = {}) {\n const {wrapper: MDXLayout} = {\n ..._provideComponents(),\n ...props.components\n };\n return MDXLayout ? _jsx(MDXLayout, {\n ...props,\n children: _jsx(_createMdxContent, {\n ...props\n })\n }) : _createMdxContent(props);\n}\nreturn {\n default: MDXContent\n};\n","frontmatter":{},"scope":{}},"pageType":"default","mdx":{"mdxSource":{"compiledSource":"\"use strict\";const{Fragment:_Fragment,jsx:_jsx,jsxs:_jsxs}=arguments[0];const{useMDXComponents:_provideComponents}=arguments[0];function _createMdxContent(props){const _components={a:`a`,code:`code`,li:`li`,ol:`ol`,p:`p`,strong:`strong`,ul:`ul`,..._provideComponents(),...props.components},{Heading,Note,OptimizedImage,Tip}=_components;if(!Heading)_missingMdxReference(`Heading`,true);if(!Note)_missingMdxReference(`Note`,true);if(!OptimizedImage)_missingMdxReference(`OptimizedImage`,true);if(!Tip)_missingMdxReference(`Tip`,true);return _jsxs(_Fragment,{children:[_jsx(_components.p,{children:`Before you write integration code, you can use the console to get model recommendations, narrow down the catalog, and test model behavior.`}),`\n`,_jsxs(_components.ol,{children:[`\n`,_jsxs(_components.li,{children:[`Describe your task in `,_jsx(_components.strong,{children:`Model Assistant`}),` on the `,_jsx(_components.a,{href:`https://console.scitix.ai/model-inference/home`,children:`Home`}),` page to get model and configuration suggestions.`]}),`\n`,_jsxs(_components.li,{children:[`Browse and compare models on the `,_jsx(_components.a,{href:`https://console.scitix.ai/model-inference/models`,children:`Models`}),` page, then review model details.`]}),`\n`,_jsxs(_components.li,{children:[`Test the selected model in the `,_jsx(_components.a,{href:`https://console.scitix.ai/model-inference/playground`,children:`Playground`}),`.`]}),`\n`]}),`\n`,_jsx(Heading,{level:`2`,id:`1-review-and-choose-a-model`,children:`1. Review and choose a model`}),`\n`,_jsxs(_components.p,{children:[`If you are not sure which model to start with, describe your task in `,_jsx(_components.strong,{children:`Model Assistant`}),` on the `,_jsx(_components.a,{href:`https://console.scitix.ai/model-inference/home`,children:`Home`}),` page. Model Assistant recommends suitable models and configuration suggestions based on your goal, and asks follow-up questions when more constraints are needed. You can also start from common scenarios such as document summarization, coding assistance, and text classification.`]}),`\n`,_jsx(OptimizedImage,{src:`https://mintcdn.com/scitix-adfc65c2/OjGvTLozBD05uLOS/model-inference/media/model-assistant.png?fit=max\u0026auto=format\u0026n=OjGvTLozBD05uLOS\u0026q=85\u0026s=36357bfb3ed182b3a9c81b51dc65a615`,alt:`Model Assistant`,\"data-og-width\":`2466`,width:`2466`,\"data-og-height\":`488`,height:`488`,\"data-path\":`model-inference/media/model-assistant.png`,\"data-optimize\":`true`,\"data-opv\":`3`,srcset:`https://mintcdn.com/scitix-adfc65c2/OjGvTLozBD05uLOS/model-inference/media/model-assistant.png?w=280\u0026fit=max\u0026auto=format\u0026n=OjGvTLozBD05uLOS\u0026q=85\u0026s=472c7bef079fd0d1302cf3b9b4d71648 280w, https://mintcdn.com/scitix-adfc65c2/OjGvTLozBD05uLOS/model-inference/media/model-assistant.png?w=560\u0026fit=max\u0026auto=format\u0026n=OjGvTLozBD05uLOS\u0026q=85\u0026s=9305f7e40c05f65e236af70cc5e06252 560w, https://mintcdn.com/scitix-adfc65c2/OjGvTLozBD05uLOS/model-inference/media/model-assistant.png?w=840\u0026fit=max\u0026auto=format\u0026n=OjGvTLozBD05uLOS\u0026q=85\u0026s=30af399ba7f6e1ce1f359c277919840c 840w, https://mintcdn.com/scitix-adfc65c2/OjGvTLozBD05uLOS/model-inference/media/model-assistant.png?w=1100\u0026fit=max\u0026auto=format\u0026n=OjGvTLozBD05uLOS\u0026q=85\u0026s=faea5ce614f18bc925e0d2a6e4c56d20 1100w, https://mintcdn.com/scitix-adfc65c2/OjGvTLozBD05uLOS/model-inference/media/model-assistant.png?w=1650\u0026fit=max\u0026auto=format\u0026n=OjGvTLozBD05uLOS\u0026q=85\u0026s=56ae7f4b54099bad59d7e59da44d34d9 1650w, https://mintcdn.com/scitix-adfc65c2/OjGvTLozBD05uLOS/model-inference/media/model-assistant.png?w=2500\u0026fit=max\u0026auto=format\u0026n=OjGvTLozBD05uLOS\u0026q=85\u0026s=05448e7fd9d8881de43ad1bf398e1dc1 2500w`}),`\n`,_jsxs(_components.p,{children:[`Open the `,_jsx(_components.a,{href:`https://console.scitix.ai/model-inference/models`,children:`Models`}),` page to filter models by organization, category, context window, price, and other dimensions.`]}),`\n`,_jsxs(_components.p,{children:[`On each model card, you can review key information such as model name, context window, and price. Open `,_jsx(_components.strong,{children:`View Details`}),` to get additional information, including invocation examples.`]}),`\n`,_jsx(Tip,{children:_jsxs(_components.p,{children:[`The platform provides copy-ready `,_jsx(_components.strong,{children:`curl`}),` and `,_jsx(_components.strong,{children:`Python`}),` examples to help you call models quickly. When calling the API, use the model name exactly as shown on the model details page.`]})}),`\n`,_jsx(Heading,{level:`2`,id:`2-test-in-playground`,children:`2. Test in Playground`}),`\n`,_jsxs(_components.p,{children:[`On a model card, choose `,_jsx(_components.strong,{children:`Try Now`}),` to open Playground with the selected model. You can enter prompts directly, observe responses, and compare parameter behavior before integrating the model into your application.`]}),`\n`,_jsx(Note,{children:_jsx(_components.p,{children:`Some model categories, such as embedding models, are not supported in Playground. Call them through the API instead.`})}),`\n`,_jsx(OptimizedImage,{src:`https://mintcdn.com/scitix-adfc65c2/zz3UuyM3SCvVbeP9/model-inference/media/trial-center.png?fit=max\u0026auto=format\u0026n=zz3UuyM3SCvVbeP9\u0026q=85\u0026s=99da6b4d6f3d26d15021647d3c3bdbd0`,alt:`ScitiX Model Inference Playground with model parameters and chat response preview`,\"data-og-width\":`3816`,width:`3816`,\"data-og-height\":`1836`,height:`1836`,\"data-path\":`model-inference/media/trial-center.png`,\"data-optimize\":`true`,\"data-opv\":`3`,srcset:`https://mintcdn.com/scitix-adfc65c2/zz3UuyM3SCvVbeP9/model-inference/media/trial-center.png?w=280\u0026fit=max\u0026auto=format\u0026n=zz3UuyM3SCvVbeP9\u0026q=85\u0026s=7ef53159e5d727f614c4f5865daef50e 280w, https://mintcdn.com/scitix-adfc65c2/zz3UuyM3SCvVbeP9/model-inference/media/trial-center.png?w=560\u0026fit=max\u0026auto=format\u0026n=zz3UuyM3SCvVbeP9\u0026q=85\u0026s=b0011a7a5c9b462b8f2dde5944c9c511 560w, https://mintcdn.com/scitix-adfc65c2/zz3UuyM3SCvVbeP9/model-inference/media/trial-center.png?w=840\u0026fit=max\u0026auto=format\u0026n=zz3UuyM3SCvVbeP9\u0026q=85\u0026s=6445c1c0ee9f460bfeba45346095ae6b 840w, https://mintcdn.com/scitix-adfc65c2/zz3UuyM3SCvVbeP9/model-inference/media/trial-center.png?w=1100\u0026fit=max\u0026auto=format\u0026n=zz3UuyM3SCvVbeP9\u0026q=85\u0026s=dd1436efb83b921213d82ef87e5b5d1b 1100w, https://mintcdn.com/scitix-adfc65c2/zz3UuyM3SCvVbeP9/model-inference/media/trial-center.png?w=1650\u0026fit=max\u0026auto=format\u0026n=zz3UuyM3SCvVbeP9\u0026q=85\u0026s=79eba452f736de99771ca12ca5de2442 1650w, https://mintcdn.com/scitix-adfc65c2/zz3UuyM3SCvVbeP9/model-inference/media/trial-center.png?w=2500\u0026fit=max\u0026auto=format\u0026n=zz3UuyM3SCvVbeP9\u0026q=85\u0026s=24064011370cba0310dc2c8f5ba0a418 2500w`}),`\n`,_jsx(_components.p,{children:`In Playground, you can:`}),`\n`,_jsxs(_components.ul,{children:[`\n`,_jsx(_components.li,{children:`Switch models from the model selector.`}),`\n`,_jsxs(_components.li,{children:[`Pick a preset, such as `,_jsx(_components.strong,{children:`Balanced`}),`, `,_jsx(_components.strong,{children:`Creative`}),`, or `,_jsx(_components.strong,{children:`Precise`}),`, or use a custom configuration.`]}),`\n`,_jsxs(_components.li,{children:[`Use a `,_jsx(_components.strong,{children:`system prompt`}),` to set the assistant’s role, tone, or constraints.`]}),`\n`,_jsx(_components.li,{children:`Tune parameters such as Temperature, Top P, Top K, Max tokens, and Frequency penalty.`}),`\n`,_jsx(_components.li,{children:`View the context window and current session usage.`}),`\n`,_jsx(_components.li,{children:`Reset or save the current configuration as needed.`}),`\n`]}),`\n`,_jsx(Tip,{children:_jsxs(_components.p,{children:[`In Playground, `,_jsx(_components.strong,{children:`Max tokens`}),` corresponds to the API parameter `,_jsx(_components.code,{children:`max_completion_tokens`}),`. For reasoning models, it limits the combined total of reasoning tokens and visible output tokens. For details, see `,_jsx(_components.a,{href:`/model-inference/usage/billing`,children:`Token Usage and Billing`}),`.`]})}),`\n`,_jsx(_components.p,{children:`Parameters a model does not support are disabled automatically, so only valid settings are sent. Each user’s configuration is saved per model.`}),`\n`,_jsx(Heading,{level:`2`,id:`3-monitor-usage`,children:`3. Monitor usage`}),`\n`,_jsxs(_components.p,{children:[`On the `,_jsx(_components.a,{href:`https://console.scitix.ai/model-inference/home`,children:`Home`}),` page, you can view usage overview data, including token consumption, API requests, throughput trends, Top Models, Top API Keys, and member usage, to quickly understand the main sources of traffic. Member usage is visible only to administrators.`]}),`\n`,_jsxs(_components.p,{children:[`To inspect request details and aggregated metrics, see `,_jsx(_components.a,{href:`/model-inference/usage/view-usage`,children:`View Usage`}),` and `,_jsx(_components.a,{href:`/model-inference/usage/view-metrics`,children:`View Metrics`}),`.`]}),`\n`,_jsx(Heading,{level:`2`,id:`4-move-to-api-calls`,children:`4. Move to API calls`}),`\n`,_jsx(_components.p,{children:`Once the model and parameters are confirmed, create an API key and call the model from your application.`})]})}function MDXContent(props={}){const{wrapper:MDXLayout}={..._provideComponents(),...props.components};return MDXLayout?_jsx(MDXLayout,{...props,children:_jsx(_createMdxContent,{...props})}):_createMdxContent(props)}return{default:MDXContent};function _missingMdxReference(id,component){throw new Error(`Expected `+(component?`component`:`object`)+\" `\"+id+\"` to be defined: you likely forgot to import, pass, or provide it.\")}","frontmatter":{},"scope":{"config":{},"pageMetadata":{"title":"Model Selection \u0026 Playground","description":"Learn how to use Model Assistant, Models, and Playground to select models, review model details, and test responses before integrating the Model Inference API.","keywords":"Model Assistant, ScitiX Models, model selection, model playground, Model Inference, test AI models","sidebarTitle":"Model Selection \u0026 Playground","href":"/model-inference/get-started/model-selection-playground"}}},"mdxSourceWithNoJs":null},"mdxExtracts":{"tableOfContents":[{"title":"1. Review and choose a model","slug":"1-review-and-choose-a-model","depth":2,"children":[]},{"title":"2. Test in Playground","slug":"2-test-in-playground","depth":2,"children":[]},{"title":"3. Monitor usage","slug":"3-monitor-usage","depth":2,"children":[]},{"title":"4. Move to API calls","slug":"4-move-to-api-calls","depth":2,"children":[]}],"codeExamples":{}},"jsLinks":["/_mintlify/custom/scitix-adfc65c2/71d9e3cb995fb63a/assistant-guard.js"],"subdomain":"scitix-adfc65c2","siteName":"ScitiX","title":"Model Selection \u0026 Playground - ScitiX","navMaps":{"firstHrefInVersion":{},"firstHrefInLanguage":{}},"lastModified":"2026-09-17T12:20:10.436Z","originalFileLocation":"model-inference/get-started/model-selection-playground.mdx"},"headHtml":"\u003cscript data-mint-head>(function(){var d=document.documentElement,p=null;if(!p){try{p=localStorage.getItem(\"isDarkMode\")}catch(e){}if(p==='true')p='dark';else if(p==='false')p='light';if(p!=='light'\u0026\u0026p!=='dark'\u0026\u0026p!=='system')p=\"system\"}var r=p==='system'?(matchMedia(\"(prefers-color-scheme: dark)\").matches?'dark':'light'):p;d.classList.remove(r==='dark'?'light':'dark');d.classList.add(r);d.setAttribute(\"data-theme-preference\",p)})();\u003c/script>\u003cmeta data-mint-head name=\"description\" content=\"Learn how to use Model Assistant, Models, and Playground to select models, review model details, and test responses before integrating the Model Inference API.\">\u003cmeta data-mint-head name=\"application-name\" content=\"ScitiX\">\u003cmeta data-mint-head name=\"generator\" content=\"Mintlify\">\u003clink data-mint-head rel=\"icon\" type=\"image/png\" sizes=\"192x192\" href=\"/mintlify-assets/_mintlify/favicons/scitix-adfc65c2/F8DlhDrdwumorHBL/_generated/favicon/android-chrome-192x192.png\" media=\"(prefers-color-scheme: light)\">\u003clink data-mint-head rel=\"apple-touch-icon\" type=\"image/png\" sizes=\"180x180\" href=\"/mintlify-assets/_mintlify/favicons/scitix-adfc65c2/F8DlhDrdwumorHBL/_generated/favicon/apple-touch-icon.png\">\u003clink data-mint-head rel=\"icon\" type=\"image/png\" sizes=\"16x16\" href=\"/mintlify-assets/_mintlify/favicons/scitix-adfc65c2/F8DlhDrdwumorHBL/_generated/favicon/favicon-16x16.png\" media=\"(prefers-color-scheme: light)\">\u003clink data-mint-head rel=\"icon\" type=\"image/png\" sizes=\"32x32\" href=\"/mintlify-assets/_mintlify/favicons/scitix-adfc65c2/F8DlhDrdwumorHBL/_generated/favicon/favicon-32x32.png\" media=\"(prefers-color-scheme: light)\">\u003clink data-mint-head rel=\"shortcut icon\" type=\"image/x-icon\" href=\"/mintlify-assets/_mintlify/favicons/scitix-adfc65c2/F8DlhDrdwumorHBL/_generated/favicon/favicon.ico\" media=\"(prefers-color-scheme: light)\">\u003clink data-mint-head rel=\"icon\" type=\"image/png\" sizes=\"192x192\" href=\"/mintlify-assets/_mintlify/favicons/scitix-adfc65c2/F8DlhDrdwumorHBL/_generated/favicon-dark/android-chrome-192x192.png\" media=\"(prefers-color-scheme: dark)\">\u003clink data-mint-head rel=\"icon\" type=\"image/png\" sizes=\"16x16\" href=\"/mintlify-assets/_mintlify/favicons/scitix-adfc65c2/F8DlhDrdwumorHBL/_generated/favicon-dark/favicon-16x16.png\" media=\"(prefers-color-scheme: dark)\">\u003clink data-mint-head rel=\"icon\" type=\"image/png\" sizes=\"32x32\" href=\"/mintlify-assets/_mintlify/favicons/scitix-adfc65c2/F8DlhDrdwumorHBL/_generated/favicon-dark/favicon-32x32.png\" media=\"(prefers-color-scheme: dark)\">\u003clink data-mint-head rel=\"shortcut icon\" type=\"image/x-icon\" href=\"/mintlify-assets/_mintlify/favicons/scitix-adfc65c2/F8DlhDrdwumorHBL/_generated/favicon-dark/favicon.ico\" media=\"(prefers-color-scheme: dark)\">\u003cmeta data-mint-head property=\"og:title\" content=\"Model Selection \u0026amp; Playground - ScitiX\">\u003cmeta data-mint-head property=\"og:description\" content=\"Learn how to use Model Assistant, Models, and Playground to select models, review model details, and test responses before integrating the Model Inference API.\">\u003cmeta data-mint-head property=\"og:site_name\" content=\"ScitiX Documentation\">\u003cmeta data-mint-head property=\"og:url\" content=\"https://docs.scitix.ai/model-inference/get-started/model-selection-playground\">\u003cmeta data-mint-head property=\"og:type\" content=\"website\">\u003cmeta data-mint-head property=\"og:image\" content=\"https://scitix-adfc65c2.mintlify.app/_mintlify/api/og/v2?division=Get+Started\u0026amp;title=Model+Selection+%26+Playground\u0026amp;description=Learn+how+to+use+Model+Assistant%2C+Models%2C+and+Playground+to+select+models%2C+review+model+details%2C+and+test+responses+before+integrating+the+Model+Inference+API.\u0026amp;theme=66446d36d3815c3a54012907\u0026amp;signature=8dc9f69a918448fcdfb213d93a5077789675f8101dda45d6afcea59cef5703a4\">\u003cmeta data-mint-head property=\"og:image:width\" content=\"1200\">\u003cmeta data-mint-head property=\"og:image:height\" content=\"630\">\u003cmeta data-mint-head name=\"twitter:card\" content=\"summary_large_image\">\u003cmeta data-mint-head name=\"twitter:title\" content=\"Model Selection \u0026amp; Playground - ScitiX\">\u003cmeta data-mint-head name=\"twitter:description\" content=\"Learn how to use Model Assistant, Models, and Playground to select models, review model details, and test responses before integrating the Model Inference API.\">\u003cmeta data-mint-head name=\"twitter:image\" content=\"https://scitix-adfc65c2.mintlify.app/_mintlify/api/og/v2?division=Get+Started\u0026amp;title=Model+Selection+%26+Playground\u0026amp;description=Learn+how+to+use+Model+Assistant%2C+Models%2C+and+Playground+to+select+models%2C+review+model+details%2C+and+test+responses+before+integrating+the+Model+Inference+API.\u0026amp;theme=66446d36d3815c3a54012907\u0026amp;signature=8dc9f69a918448fcdfb213d93a5077789675f8101dda45d6afcea59cef5703a4\">\u003cmeta data-mint-head name=\"twitter:image:width\" content=\"1200\">\u003cmeta data-mint-head name=\"twitter:image:height\" content=\"630\">\u003cmeta data-mint-head name=\"msapplication-config\" content=\"/mintlify-assets/_mintlify/favicons/scitix-adfc65c2/F8DlhDrdwumorHBL/_generated/favicon/browserconfig.xml\">\u003cmeta data-mint-head name=\"apple-mobile-web-app-title\" content=\"ScitiX\">\u003cmeta data-mint-head name=\"msapplication-TileColor\" content=\"#3B82F6\">\u003clink data-mint-head rel=\"canonical\" href=\"https://docs.scitix.ai/model-inference/get-started/model-selection-playground\">\u003clink data-mint-head rel=\"alternate\" type=\"application/xml\" href=\"/sitemap.xml\">\u003clink data-mint-head rel=\"alternate\" type=\"text/markdown\" href=\"/model-inference/get-started/model-selection-playground.md\">\u003cscript data-mint-head type=\"application/ld+json\">{\"@context\":\"https://schema.org\",\"@graph\":[{\"@type\":\"Organization\",\"@id\":\"https://scitix.ai/#organization\",\"name\":\"ScitiX\",\"url\":\"https://scitix.ai/\",\"logo\":{\"@type\":\"ImageObject\",\"url\":\"https://mintcdn.com/scitix-adfc65c2/UDvmXctEfVsXWOHh/logo/logo.png?fit=max\u0026auto=format\u0026n=UDvmXctEfVsXWOHh\u0026q=85\u0026s=277f160d7ff5cbfac6e30e6e62d69f9f\"}},{\"@type\":\"WebSite\",\"@id\":\"https://docs.scitix.ai#website\",\"name\":\"ScitiX\",\"url\":\"https://docs.scitix.ai\",\"publisher\":{\"@id\":\"https://scitix.ai/#organization\"}},{\"@type\":\"WebPage\",\"@id\":\"https://docs.scitix.ai/model-inference/get-started/model-selection-playground#webpage\",\"url\":\"https://docs.scitix.ai/model-inference/get-started/model-selection-playground\",\"name\":\"Model Selection \u0026 Playground\",\"description\":\"Learn how to use Model Assistant, Models, and Playground to select models, review model details, and test responses before integrating the Model Inference API.\",\"dateModified\":\"2026-09-17T12:20:10.436Z\",\"isPartOf\":{\"@id\":\"https://docs.scitix.ai#website\"},\"breadcrumb\":{\"@id\":\"https://docs.scitix.ai/model-inference/get-started/model-selection-playground#breadcrumb\"}},{\"@type\":\"BreadcrumbList\",\"@id\":\"https://docs.scitix.ai/model-inference/get-started/model-selection-playground#breadcrumb\",\"itemListElement\":[{\"@type\":\"ListItem\",\"position\":1,\"name\":\"Get Started\",\"item\":\"https://docs.scitix.ai/model-inference/get-started/model-inference-overview\"},{\"@type\":\"ListItem\",\"position\":2,\"name\":\"Model Selection \u0026 Playground\",\"item\":\"https://docs.scitix.ai/model-inference/get-started/model-selection-playground\"}]},{\"@type\":[\"Article\",\"TechArticle\"],\"@id\":\"https://docs.scitix.ai/model-inference/get-started/model-selection-playground#article\",\"headline\":\"Model Selection \u0026 Playground\",\"name\":\"Model Selection \u0026 Playground\",\"description\":\"Learn how to use Model Assistant, Models, and Playground to select models, review model details, and test responses before integrating the Model Inference API.\",\"url\":\"https://docs.scitix.ai/model-inference/get-started/model-selection-playground\",\"mainEntityOfPage\":{\"@id\":\"https://docs.scitix.ai/model-inference/get-started/model-selection-playground#webpage\"},\"dateModified\":\"2026-09-17T12:20:10.436Z\",\"publisher\":{\"@id\":\"https://scitix.ai/#organization\"},\"isPartOf\":{\"@id\":\"https://docs.scitix.ai#website\"}}]}\u003c/script>\u003cscript data-mint-head type=\"application/ld+json\">{\"@context\":\"https://schema.org\",\"@type\":\"WebSite\",\"name\":\"ScitiX\",\"creator\":{\"@type\":\"Organization\",\"name\":\"Mintlify\",\"url\":\"https://mintlify.com\"}}\u003c/script>","siteName":"ScitiX","nav":{"global":null,"tabs":[{"tab":"Model Inference","groups":[{"group":"Get Started","pages":[{"title":"Model Inference","description":"Learn what ScitiX Model Inference provides, including OpenAI-compatible APIs, model access, usage management, and common AI application scenarios.","sidebarTitle":"Overview","href":"/model-inference/get-started/model-inference-overview"},{"title":"Model Selection \u0026 Playground","sidebarTitle":"Model Selection \u0026 Playground","href":"/model-inference/get-started/model-selection-playground"},{"title":"First API Call","description":"Make your first ScitiX Model Inference API call by creating an API key, choosing a model, and sending an OpenAI-compatible request.","sidebarTitle":"First API Call","href":"/model-inference/get-started/first-api-call"},{"title":"Connect ScitiX Docs to AI","sidebarTitle":"Connect Docs to AI","href":"/model-inference/get-started/connect-docs-to-ai"}]},{"group":"Models","pages":[{"title":"Text Generation","href":"/model-inference/models/text-generation"},{"title":"Reasoning","href":"/model-inference/models/reasoning"},{"title":"Vision and Multimodal","href":"/model-inference/models/vision-and-multimodal"},{"title":"Embedding","href":"/model-inference/models/embedding"},{"title":"Speech","href":"/model-inference/models/speech"},{"title":"Function Calling","sidebarTitle":"Function Calling","href":"/model-inference/models/function-calling"},{"title":"Structured Output","sidebarTitle":"Structured Output","href":"/model-inference/models/structured-output"},{"title":"Streaming","sidebarTitle":"Streaming","href":"/model-inference/models/streaming"},{"title":"Long Context","sidebarTitle":"Long Context","href":"/model-inference/models/long-context"},{"title":"Prompt Caching","sidebarTitle":"Prompt Caching","href":"/model-inference/models/prompt-caching"}]},{"group":"Usage","pages":[{"title":"Token Usage and Billing","href":"/model-inference/usage/billing"},{"title":"View Usage","href":"/model-inference/usage/view-usage"},{"title":"View Metrics","href":"/model-inference/usage/view-metrics"},{"title":"API Keys","href":"/model-inference/usage/api-keys"}]},{"group":"API Guides","pages":[{"title":"Error Handling","href":"/model-inference/api/error-handling"}]},{"group":"Tool Integrations","pages":[{"title":"Integrations Overview","sidebarTitle":"Overview","href":"/model-inference/integrations/overview"},{"group":"Coding Agents","expanded":false,"pages":[{"title":"DeepSeek Harness","href":"/model-inference/integrations/deepseek-harness"},{"title":"Claude Code","href":"/model-inference/integrations/claude-code"},{"title":"Codex","href":"/model-inference/integrations/codex"},{"title":"OpenCode","href":"/model-inference/integrations/opencode"},{"title":"Qwen Code","href":"/model-inference/integrations/qwen-code"},{"title":"Aider","href":"/model-inference/integrations/aider"},{"title":"Goose","href":"/model-inference/integrations/goose"},{"title":"Crush","href":"/model-inference/integrations/crush"},{"title":"CC-Switch","href":"/model-inference/integrations/cc-switch"}]},{"group":"IDEs \u0026 Extensions","expanded":false,"pages":[{"title":"Cline","href":"/model-inference/integrations/cline"},{"title":"Cursor","href":"/model-inference/integrations/cursor"},{"title":"Roo Code","href":"/model-inference/integrations/roo-code"},{"title":"Kilo Code","href":"/model-inference/integrations/kilo-code"},{"title":"TRAE","href":"/model-inference/integrations/trae"},{"title":"Continue","href":"/model-inference/integrations/continue"},{"title":"Zed","href":"/model-inference/integrations/zed"}]},{"group":"Chat Clients","expanded":false,"pages":[{"title":"Cherry Studio","href":"/model-inference/integrations/cherry-studio"},{"title":"LobeChat","href":"/model-inference/integrations/lobechat"},{"title":"Open WebUI","href":"/model-inference/integrations/open-webui"},{"title":"NextChat","href":"/model-inference/integrations/nextchat"},{"title":"Chatbox","href":"/model-inference/integrations/chatbox"},{"title":"LibreChat","href":"/model-inference/integrations/librechat"}]},{"group":"Knowledge \u0026 RAG","expanded":false,"pages":[{"title":"RAGFlow","href":"/model-inference/integrations/ragflow"},{"title":"AnythingLLM","href":"/model-inference/integrations/anythingllm"},{"title":"FastGPT","href":"/model-inference/integrations/fastgpt"},{"title":"DB-GPT","href":"/model-inference/integrations/db-gpt"},{"title":"wiseflow","href":"/model-inference/integrations/wiseflow"}]},{"group":"Notes \u0026 Writing","expanded":false,"pages":[{"title":"Obsidian Copilot","href":"/model-inference/integrations/obsidian-copilot"},{"title":"Zotero","href":"/model-inference/integrations/zotero"},{"title":"SiYuan","href":"/model-inference/integrations/siyuan"}]},{"group":"Workflow \u0026 App Platforms","expanded":false,"pages":[{"title":"Dify","href":"/model-inference/integrations/dify"},{"title":"OpenClaw","href":"/model-inference/integrations/openclaw"},{"title":"Langflow","href":"/model-inference/integrations/langflow"},{"title":"Flowise","href":"/model-inference/integrations/flowise"},{"title":"n8n","href":"/model-inference/integrations/n8n"},{"title":"Deep Research","href":"/model-inference/integrations/deep-research"},{"title":"LangBot","href":"/model-inference/integrations/langbot"},{"title":"Refly","href":"/model-inference/integrations/refly"}]},{"group":"Frameworks \u0026 SDKs","expanded":false,"pages":[{"title":"LangChain","href":"/model-inference/integrations/langchain"},{"title":"LlamaIndex","href":"/model-inference/integrations/llamaindex"},{"title":"Vercel AI SDK","href":"/model-inference/integrations/vercel-ai-sdk"},{"title":"Pydantic AI","href":"/model-inference/integrations/pydantic-ai"},{"title":"LiteLLM","href":"/model-inference/integrations/litellm"},{"title":"CrewAI","href":"/model-inference/integrations/crewai"},{"title":"AutoGen","href":"/model-inference/integrations/autogen"},{"title":"OpenManus","href":"/model-inference/integrations/openmanus"},{"title":"LazyLLM","href":"/model-inference/integrations/lazyllm"},{"title":"Chat2Graph","href":"/model-inference/integrations/chat2graph"}]},{"group":"Translation","expanded":false,"pages":[{"title":"Immersive Translate","href":"/model-inference/integrations/immersive-translate"},{"title":"PDFMathTranslate Next","href":"/model-inference/integrations/pdfmathtranslate-next"}]}]}]},{"tab":"GPU Cloud","pages":[{"title":"GPU Cloud","href":"/gpu-cloud/get-started/gpu-cloud-overview"}]},{"tab":"Account","pages":[{"title":"Account","href":"/account/account-management/initialize-account"}]},{"tab":"Changelog","pages":[{"title":"Changelog","href":"/changelog/model-launch-records"}]}]},"title":"Model Selection \u0026 Playground - ScitiX","buildId":"dpl_GnxaU9nEer7XK27kw3dpfPrs9geh","deploymentId":"dpl_GnxaU9nEer7XK27kw3dpfPrs9geh","dynamics":["a74be98ba7"],"chunks":["zoom-image-lightbox-Cv5hibpS.js","PlusIcon-owOTCErD.js","lightbox-handle-r17bVUz3.js"]}