> ## Documentation Index
> Fetch the complete documentation index at: https://docs.scitix.ai/llms.txt
> Use this file to discover all available pages before exploring further.
# Create a Cluster
## Prerequisites
Before creating a Kubernetes cluster, ensure the following prerequisites are met:
* A VPC network must already be created. If you do not have one, go to **Cloud Networks > Virtual Private Cloud** to create one. For setup instructions, refer to the VPC Private Network guide.
* A subnet must be configured within the VPC network.
* If you plan to use RDMA networking, ensure you select the appropriate availability zone: **zone-a** for IB RDMA, or **zone-b** for RoCE RDMA. Note that virtual machines do not support RDMA.
* If you plan to attach shared file storage to the cluster, ensure a filesystem has been created in advance.
## Configuration
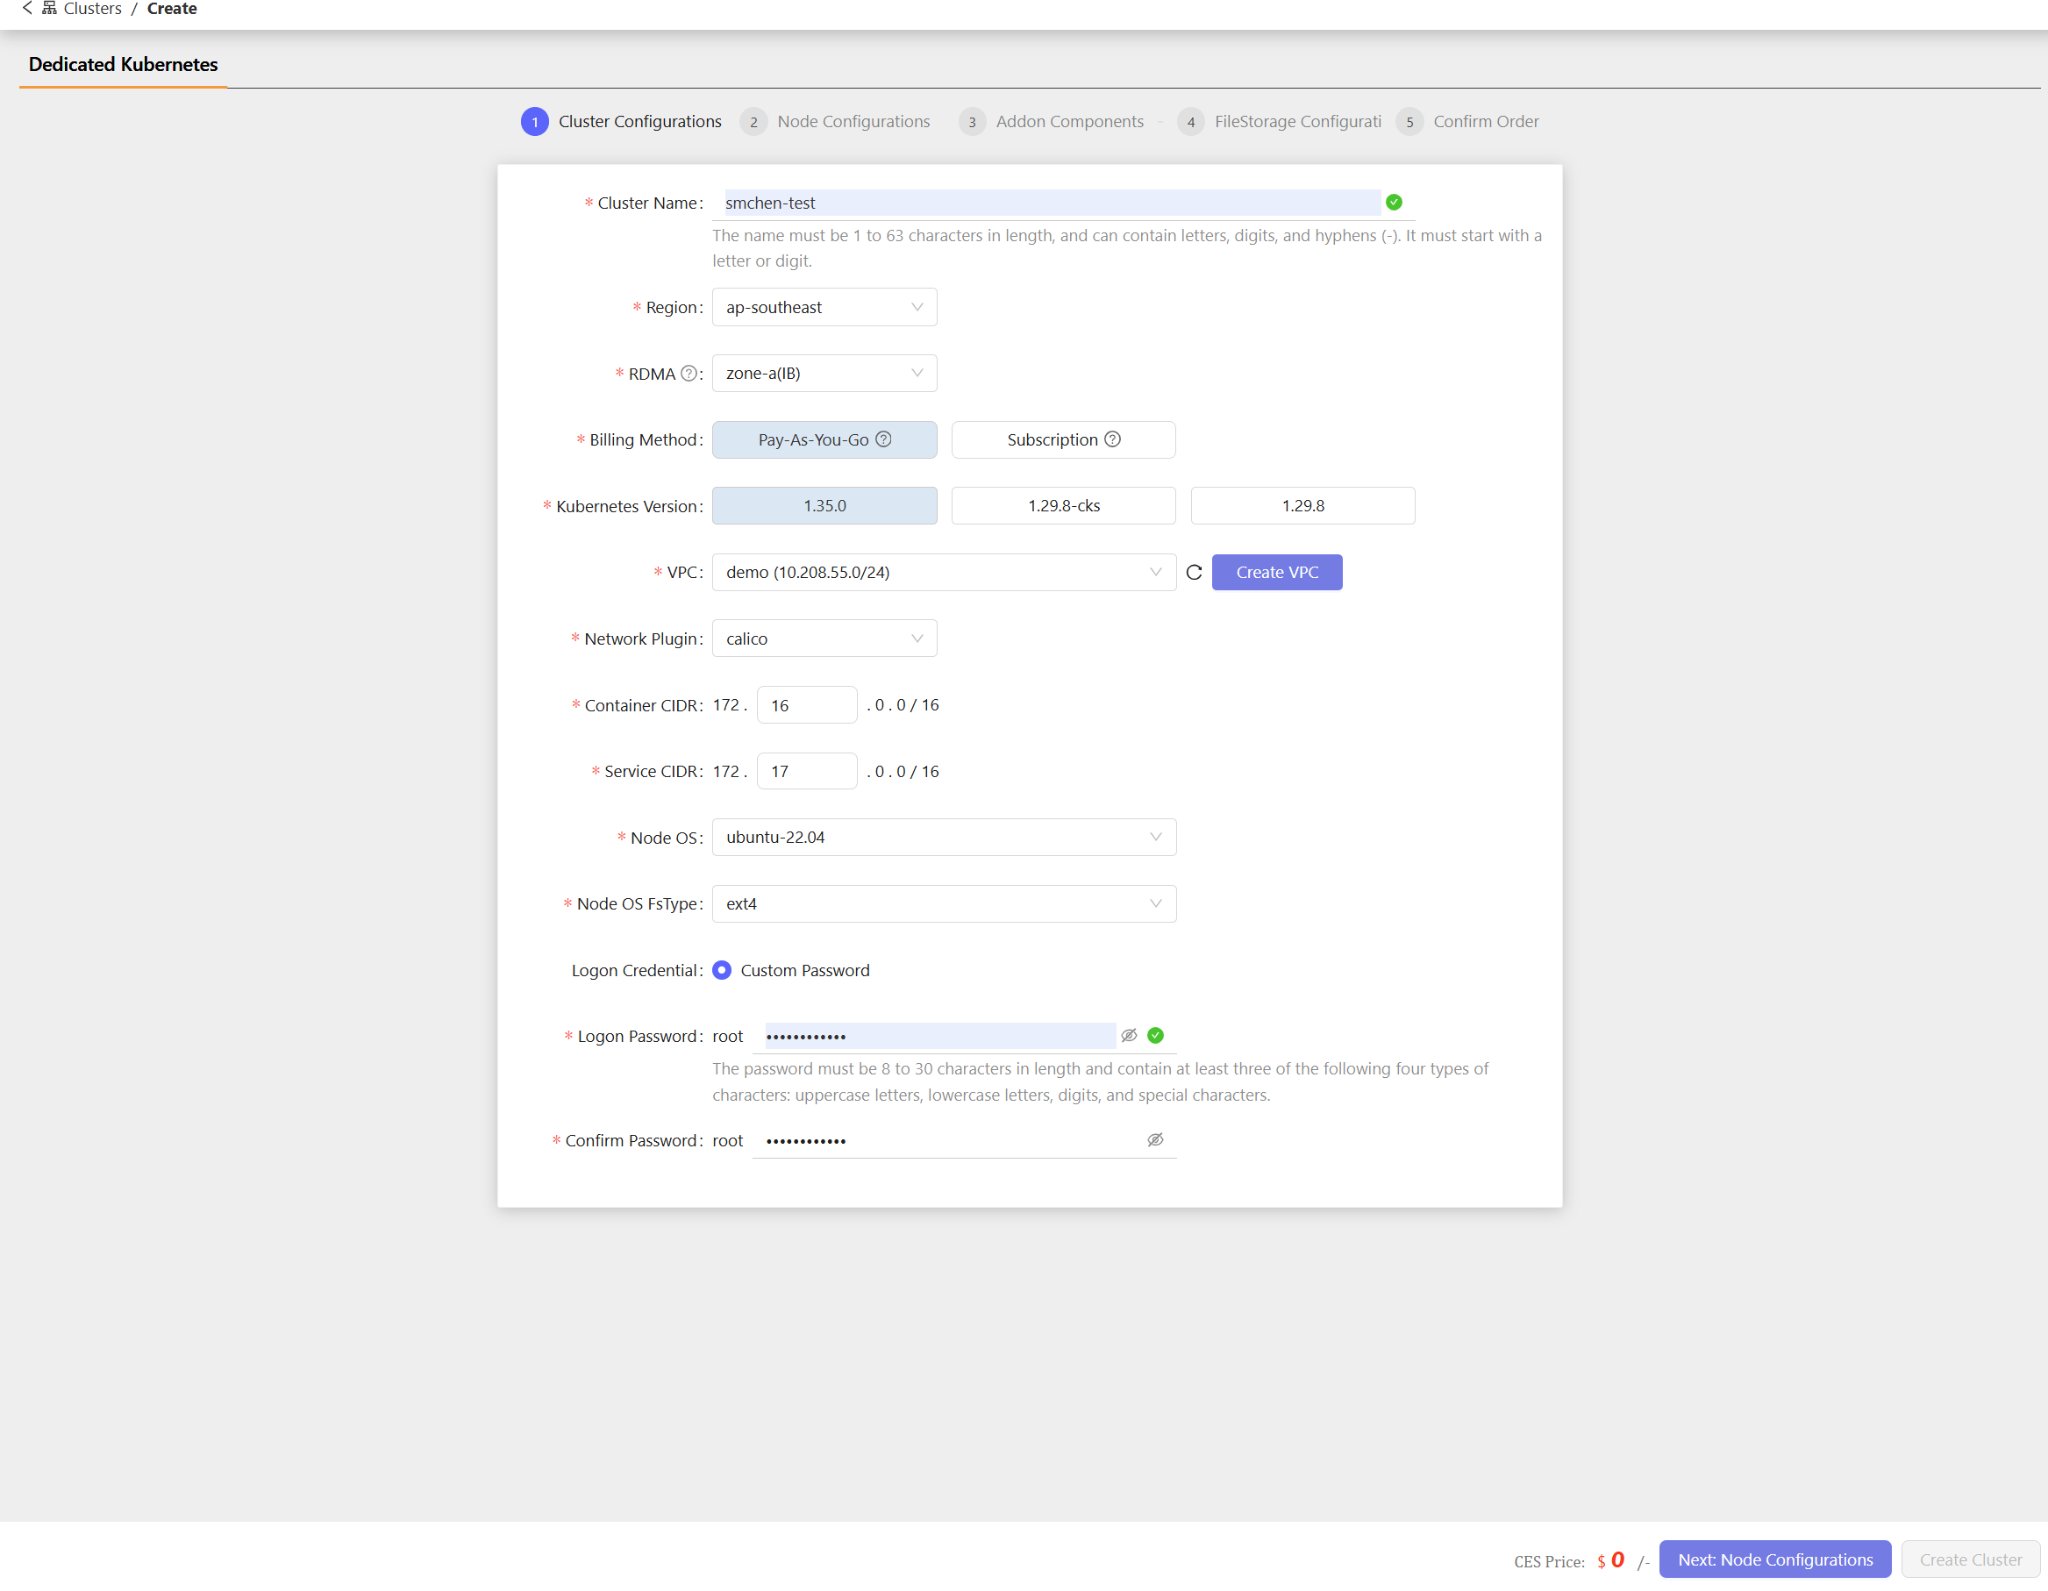
### Step 1: Cluster Configurations
| Parameter | Description |
| ---------------------- | ---------------------------------------------------------------------------------------------------------------------------------------------------------------------------------------------------------------- |
| **Cluster Name** | The name must be 1 to 63 characters in length, and can contain letters, digits, and hyphens (`-`). It must start with a letter or digit. |
| **Region** | Specifies the geographic location of the data center (e.g., `ap-southeast`, `us-west`, `us-east`). Impacts network latency — choose the region closest to your users. Cannot be modified after cluster creation. |
| **RDMA** | Determines the RDMA networking type based on availability zone. `zone-a` supports **IB RDMA**; `zone-b` supports **RoCE RDMA**. Virtual machines do not support RDMA. |
| **Billing Method** | **Pay-As-You-Go**: Use resources and pay hourly after creation. **Subscription**: Pay upfront to purchase and renew for months. |
| **Kubernetes Version** | The version of the Kubernetes control plane to deploy (e.g., `1.35.0`, `1.29.8-cks`, `1.29.8`). |
| **VPC** | Select an existing VPC network. The cluster nodes will be deployed within this VPC. If no VPC is available, click **Create VPC** to create one under Cloud Networks > Virtual Private Cloud. |
| **Network Plugin** | The CNI plugin used for pod networking within the cluster. |
| **Container CIDR** | IP address range assigned to pods within the cluster. |
| **Service CIDR** | IP address range assigned to Kubernetes services within the cluster. |
| **Node OS** | Operating system image installed on cluster nodes (e.g., `ubuntu-22.04`). |
| **Node OS FsType** | Filesystem type for node storage. Options: `ext4` or `xfs`. |
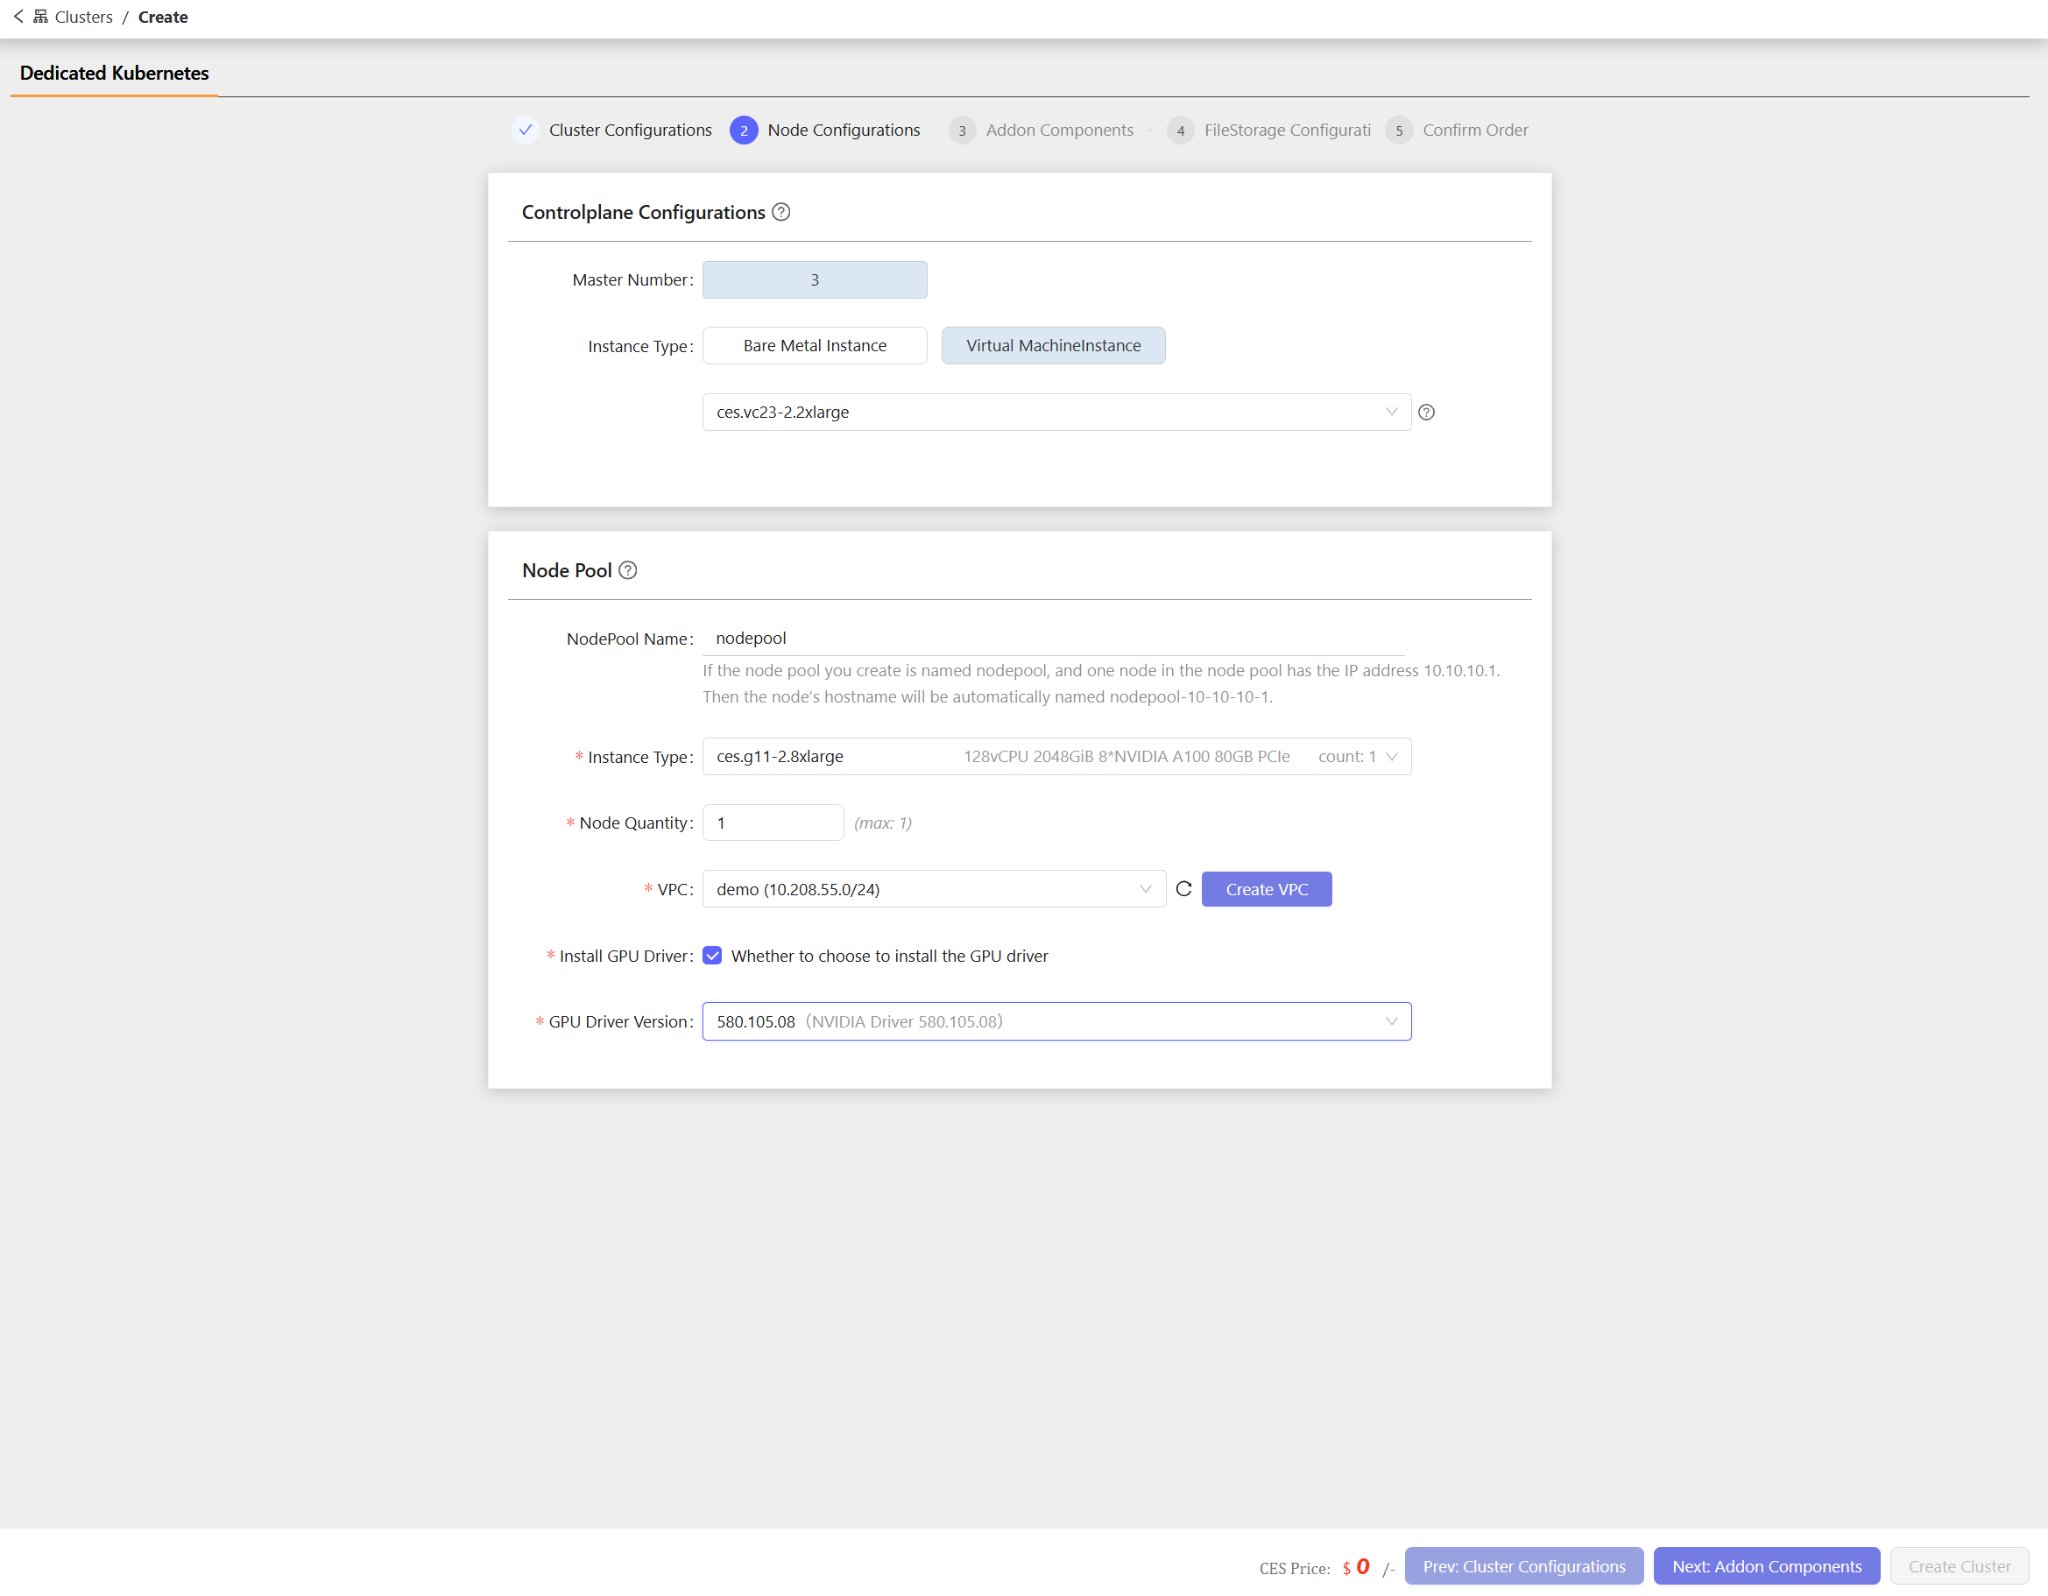
### Step 2: Node Configurations
#### Controlplane Configurations
The production cluster uses bare-metal servers to build the control plane, while the test cluster uses virtual machines.
| Parameter | Description |
| ----------------- | -------------------------------------------------------------------------------------------------------------------------------------------------------------------------------------- |
| **Master Number** | Number of control plane (master) nodes. Default is `3`. |
| **Instance Type** | Instance type for control plane nodes. Options: **Bare Metal Instance** or **Virtual Machine Instance**. Select three CPU nodes from the dropdown to create the cluster control plane. |
#### Node Pool
A node pool allows you to create and manage a group of compute nodes with the same instance type, and quickly scale them out as needed.
| Parameter | Description |
| ---------------------- | ----------------------------------------------------------------------------------------------------------------------------------------------------------------------------------------------------------------------------------------- |
| **NodePool Name** | Name for the node pool. Default is `nodepool`. The hostname of each node is automatically derived from the pool name and node IP address. For example, a node with IP `10.10.10.1` in the `nodepool` pool is named `nodepool-10-10-10-1`. |
| **Instance Type** | Instance type for worker nodes. Select from the available Bare Metal or Virtual Machine instance types. See below for detailed specifications. |
| **Node Quantity** | The number of worker nodes to include in the node pool. |
| **VPC** | Select a VPC for the node pool. If no VPC is available, click **Create VPC** to create one under Cloud Networks > Virtual Private Cloud. |
| **Install GPU Driver** | Check this option to install the GPU driver on worker nodes. Only applicable when using GPU instance types. |
| **GPU Driver Version** | Available when **Install GPU Driver** is enabled. Select the GPU driver version to install. |
#### Instance types and performance
| product type | instance name | spec |
| --------------- | ------------------ | ------------------------------------------------------------------------------------------------------------------------------------------------------------------------- |
| CES(Bare Metal) | ces.g11-7.8xlarge | CPU:Intel 8358(2.6Ghz, 32 Core)\* 2
MEM:2TB
Disk:2\*960GB (raid 1)
GPU:8\*NVIDIA A100-pcie-80G
Network:25Gbps\*2RDMA: 2\*200Gbps |
| | ces.g20-3.8xlarge | CPU: Intel 8468(2.1Ghz, 48Core) \* 2
MEM: 2T
Disk: 960G \*2 (raid 1)
GPU: H100-nvlink-80G\*8
Network: 25Gbps\*2 RDMA: NDR 400Gbps \* 4 |
| | ces.g21-3.8xlarge | CPU:Intel 8558P(48C 2.7GHz)\*2
MEM: 64G DDR5\*32 DISK: SSD960G\*2(raid1) DISK:3.84T NVMe SSD *4 GPU: H200\_nvlink-141G \*8 NEWWORK: 25Gbps*2RDMA: NDR 400Gbps \* 8 |
| | ces.c23-2 | CPU:Intel 6430(2.1Ghz,32 Core) \* 2
MEM: 64G DDR5\*32
DISK: SSD960G\*2(raid1)
Network: 25Gbps\*2RDMA: HDR 200Gbps \* 2 |
| | ces.g14-2.8xlarge | CPU:Intel 8358(2.6Ghz, 32 Core)\* 2
MEM:2TB
Disk:2\*960GB (raid 1)
GPU:NVIDIA A100-nvlink-80G \* 8
NetWork:25Gbps\*2RDMA: HDR 200Gbps \* 2 |
| VIM Instance | ces.vc23-2.2xlarge | 8 vCPU, 128G Memory, 200G Disk |
| | ces.vc23-2.4xlarge | 16 CPU, 256G Memory, 200G Disk |
| | ces.vc23-2.8xlarge | 32 CPU, 512G Memory, 200G Disk |
| | | |
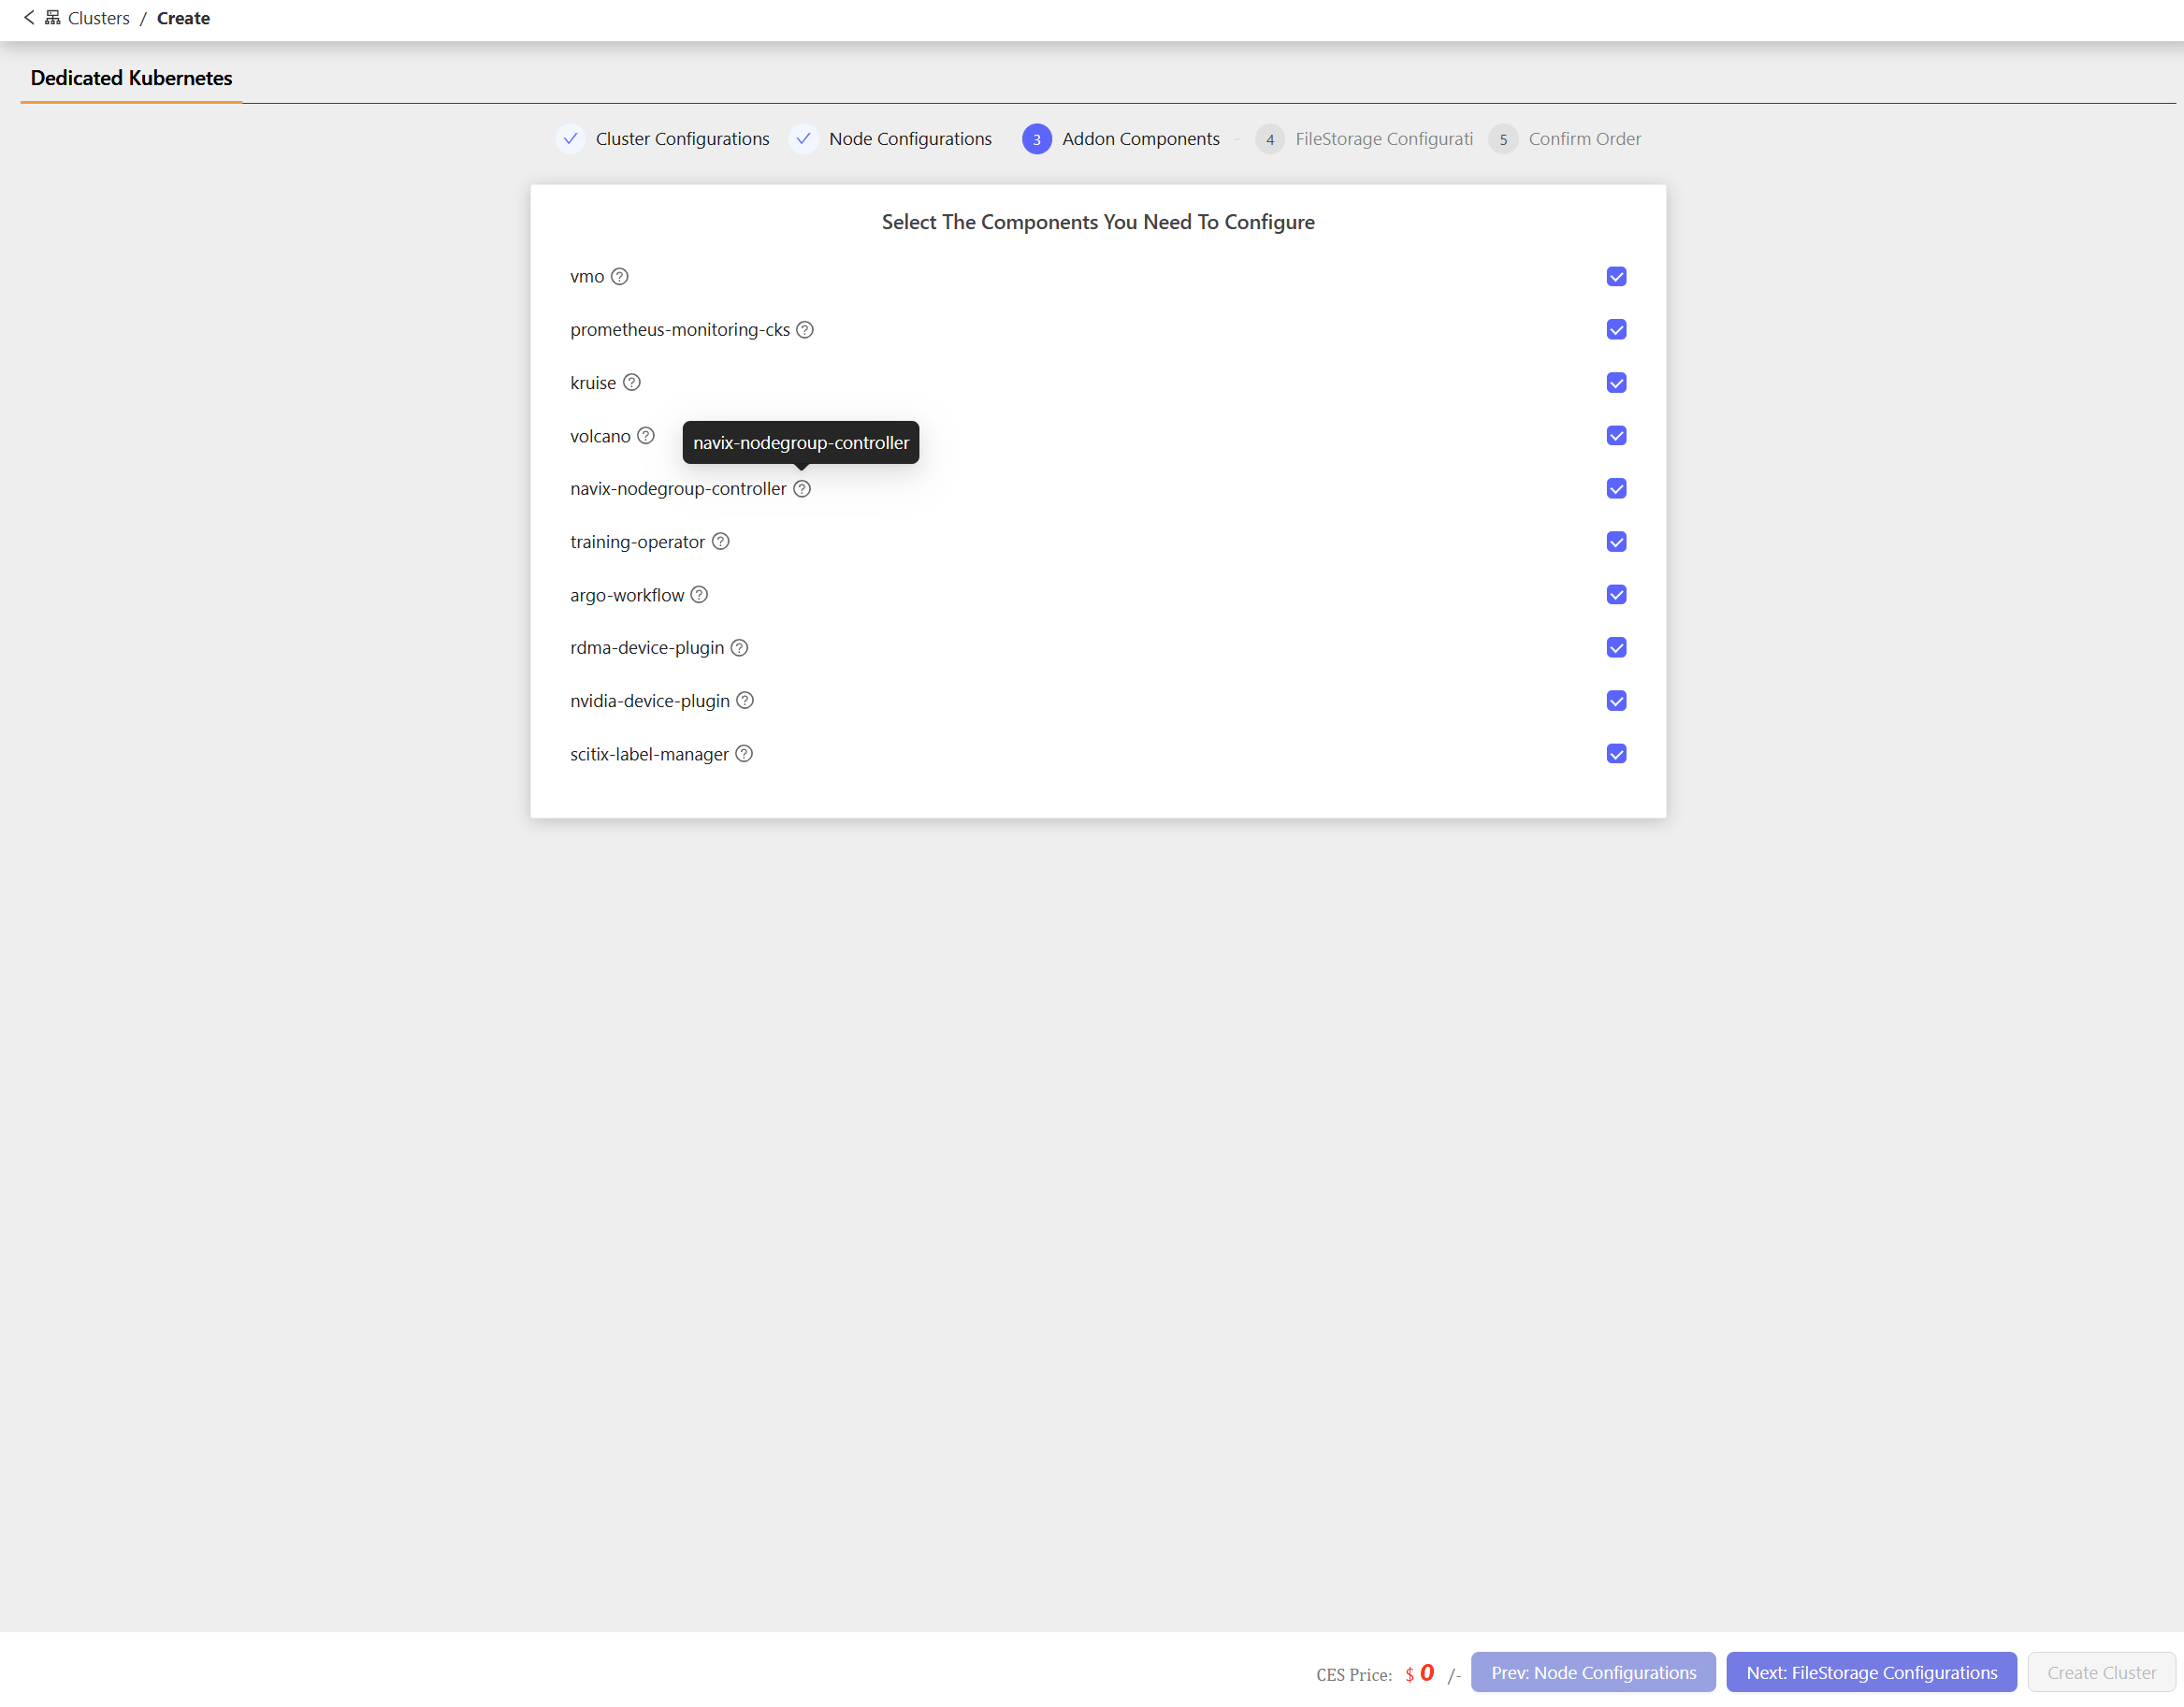
### Step 3: Addon Components
Select the optional add-on components to deploy alongside the cluster.
| Component | Description |
| ------------------------------ | ------------------------------------------------------------------------------ |
| **vmo** | victoria-metrics-operator — Manages Victoria Metrics monitoring stack. |
| **prometheus-monitoring-cks** | Prometheus for Kubernetes monitoring. |
| **kruise** | kruise — Enhanced workload management for Kubernetes. |
| **volcano** | volcano — Batch scheduling system for high-performance workloads. |
| **navix-nodegroup-controller** | navix-nodegroup-controller — Manages node group resources. |
| **training-operator** | training-operator — Manages distributed machine learning training jobs. |
| **argo-workflow** | argo-workflow — Workflow engine for orchestrating parallel jobs on Kubernetes. |
| **rdma-device-plugin** | RDMA device plugin for IB clusters. |
| **nvidia-device-plugin** | Exposes NVIDIA GPU resources to Kubernetes workloads. |
| **scitix-label-manager** | Manages node labels in a CKS cluster. |
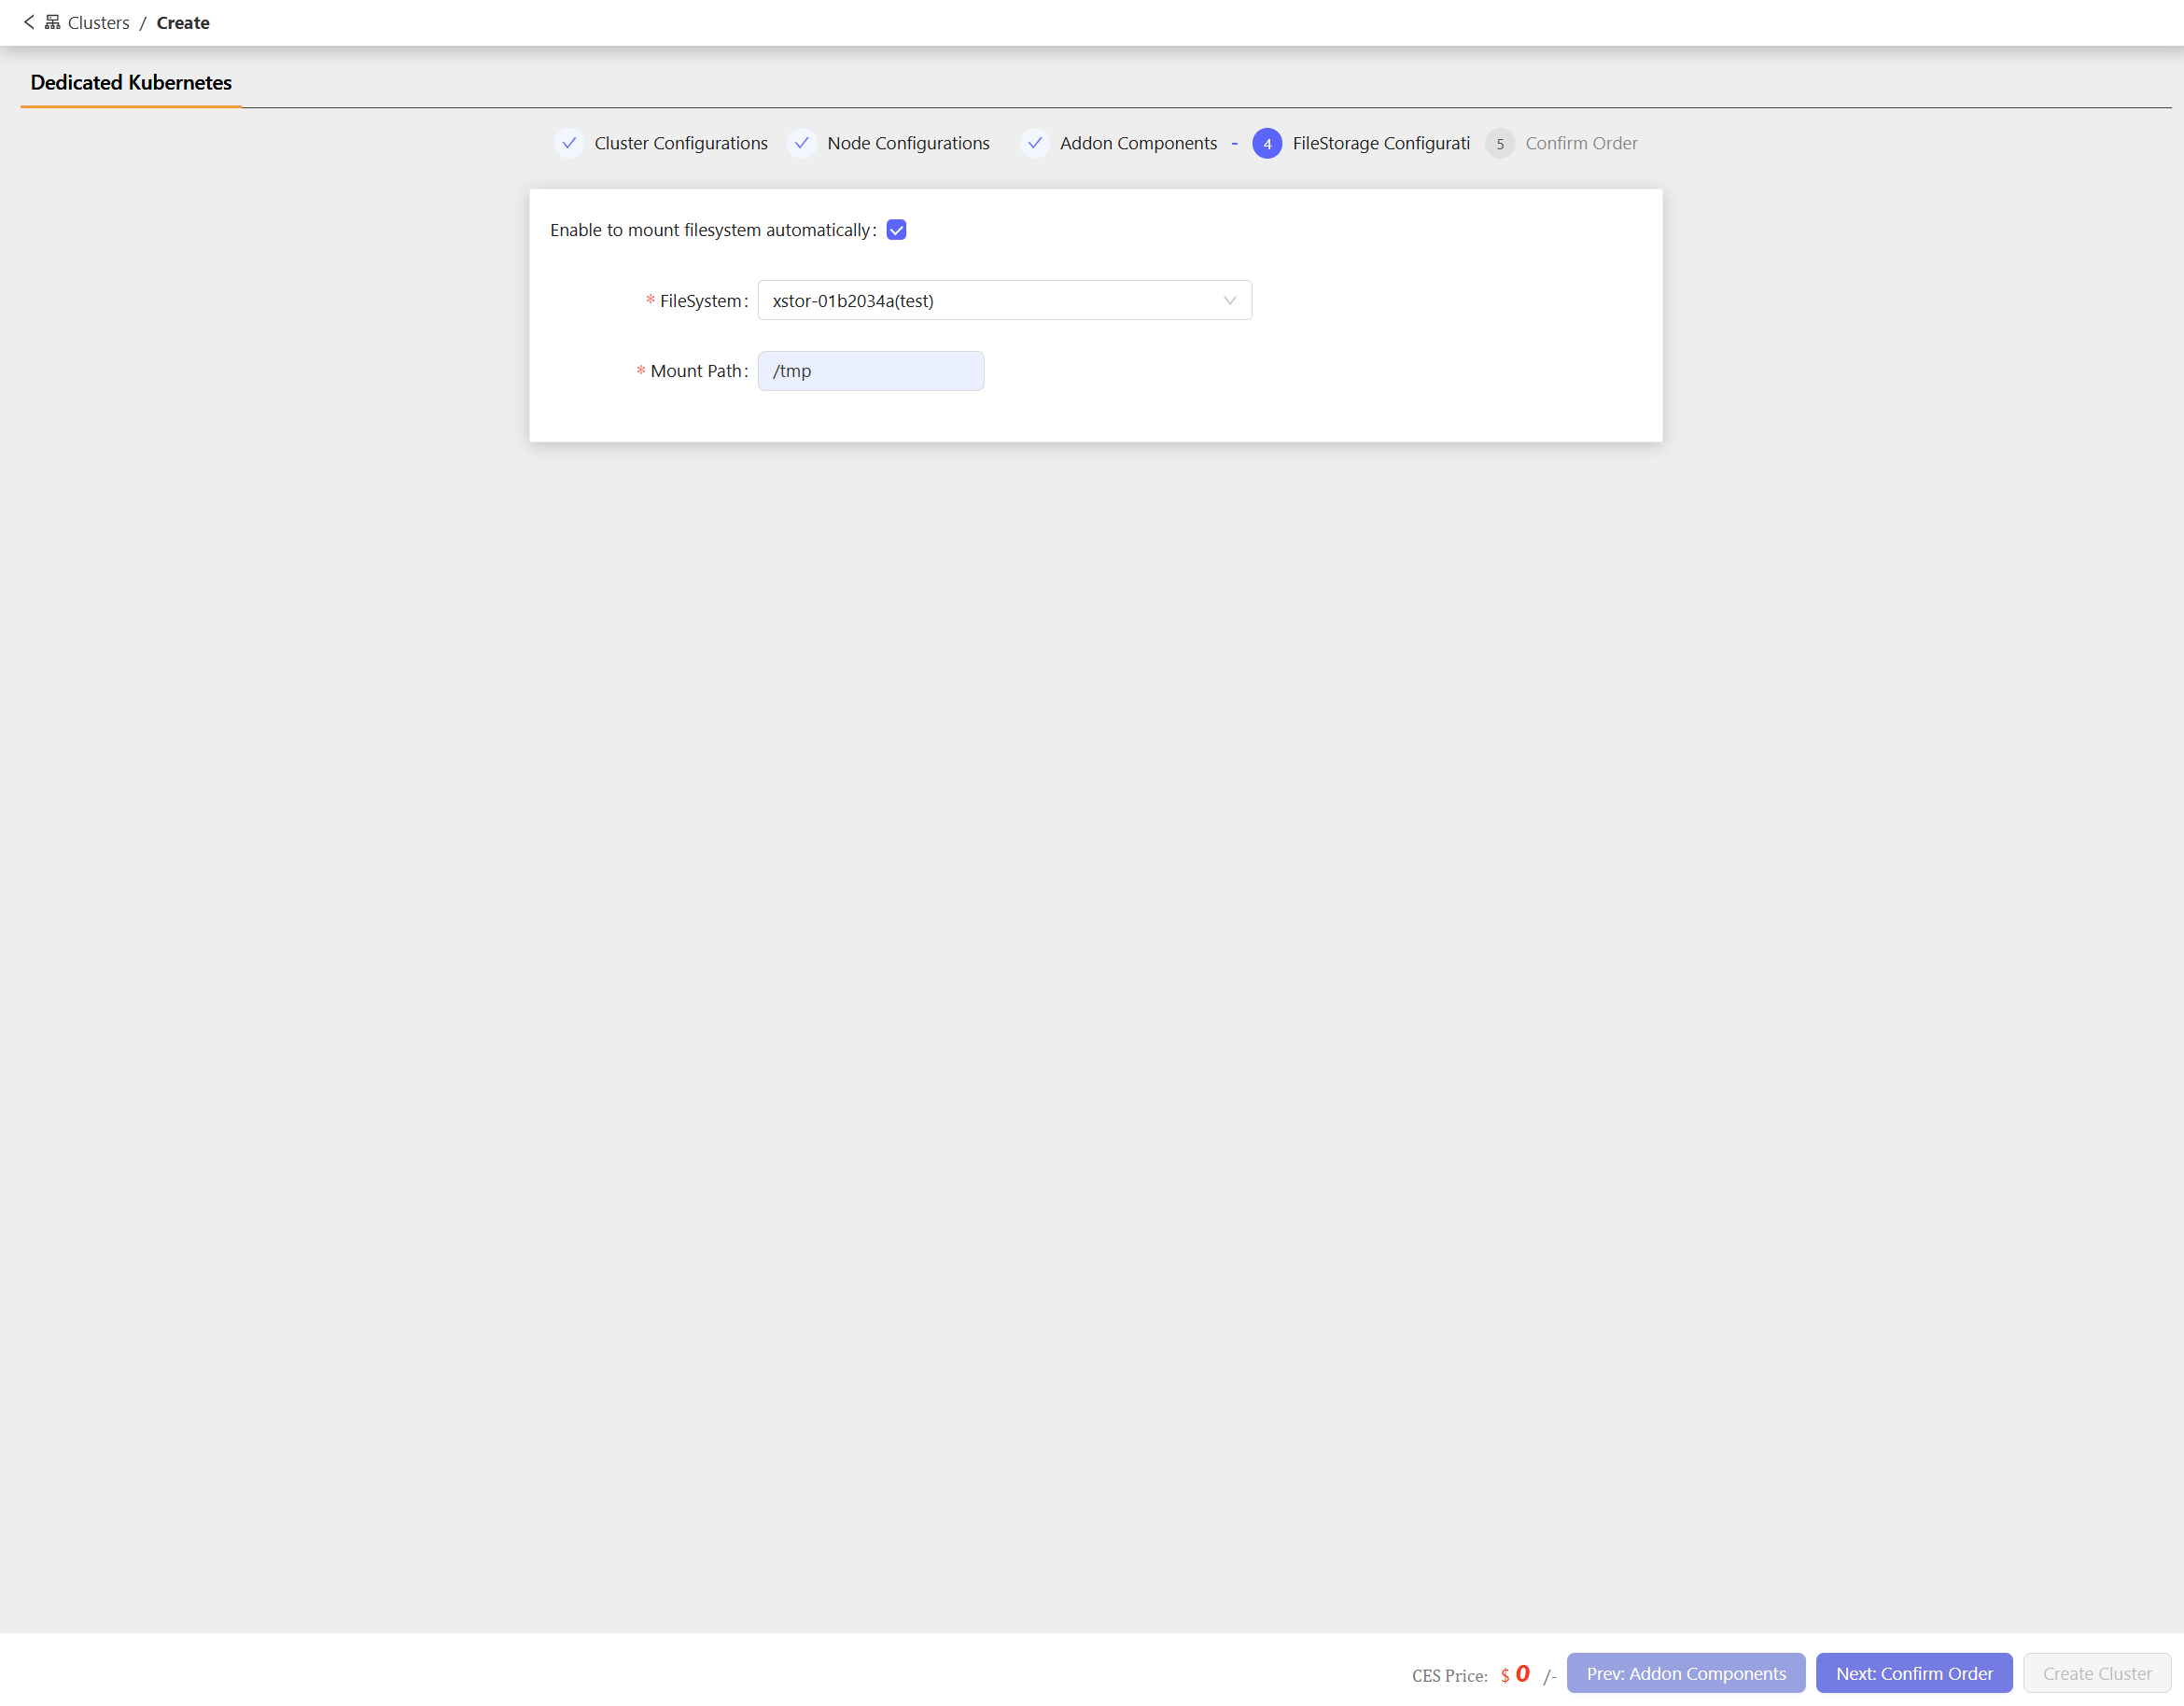
### Step 4: FileStorage Configurations
| Parameter | Description |
| -------------------------------------------- | ---------------------------------------------------------------------------------------------------------------------------------- |
| **Enable to mount filesystem automatically** | Check this option to automatically mount a shared filesystem to all cluster nodes. |
| **FileSystem** | Available when auto-mount is enabled. Select the filesystem to mount. |
| **Mount Path** | Available when auto-mount is enabled. Specify the directory path where the filesystem will be mounted on each node (e.g., `/tmp`). |
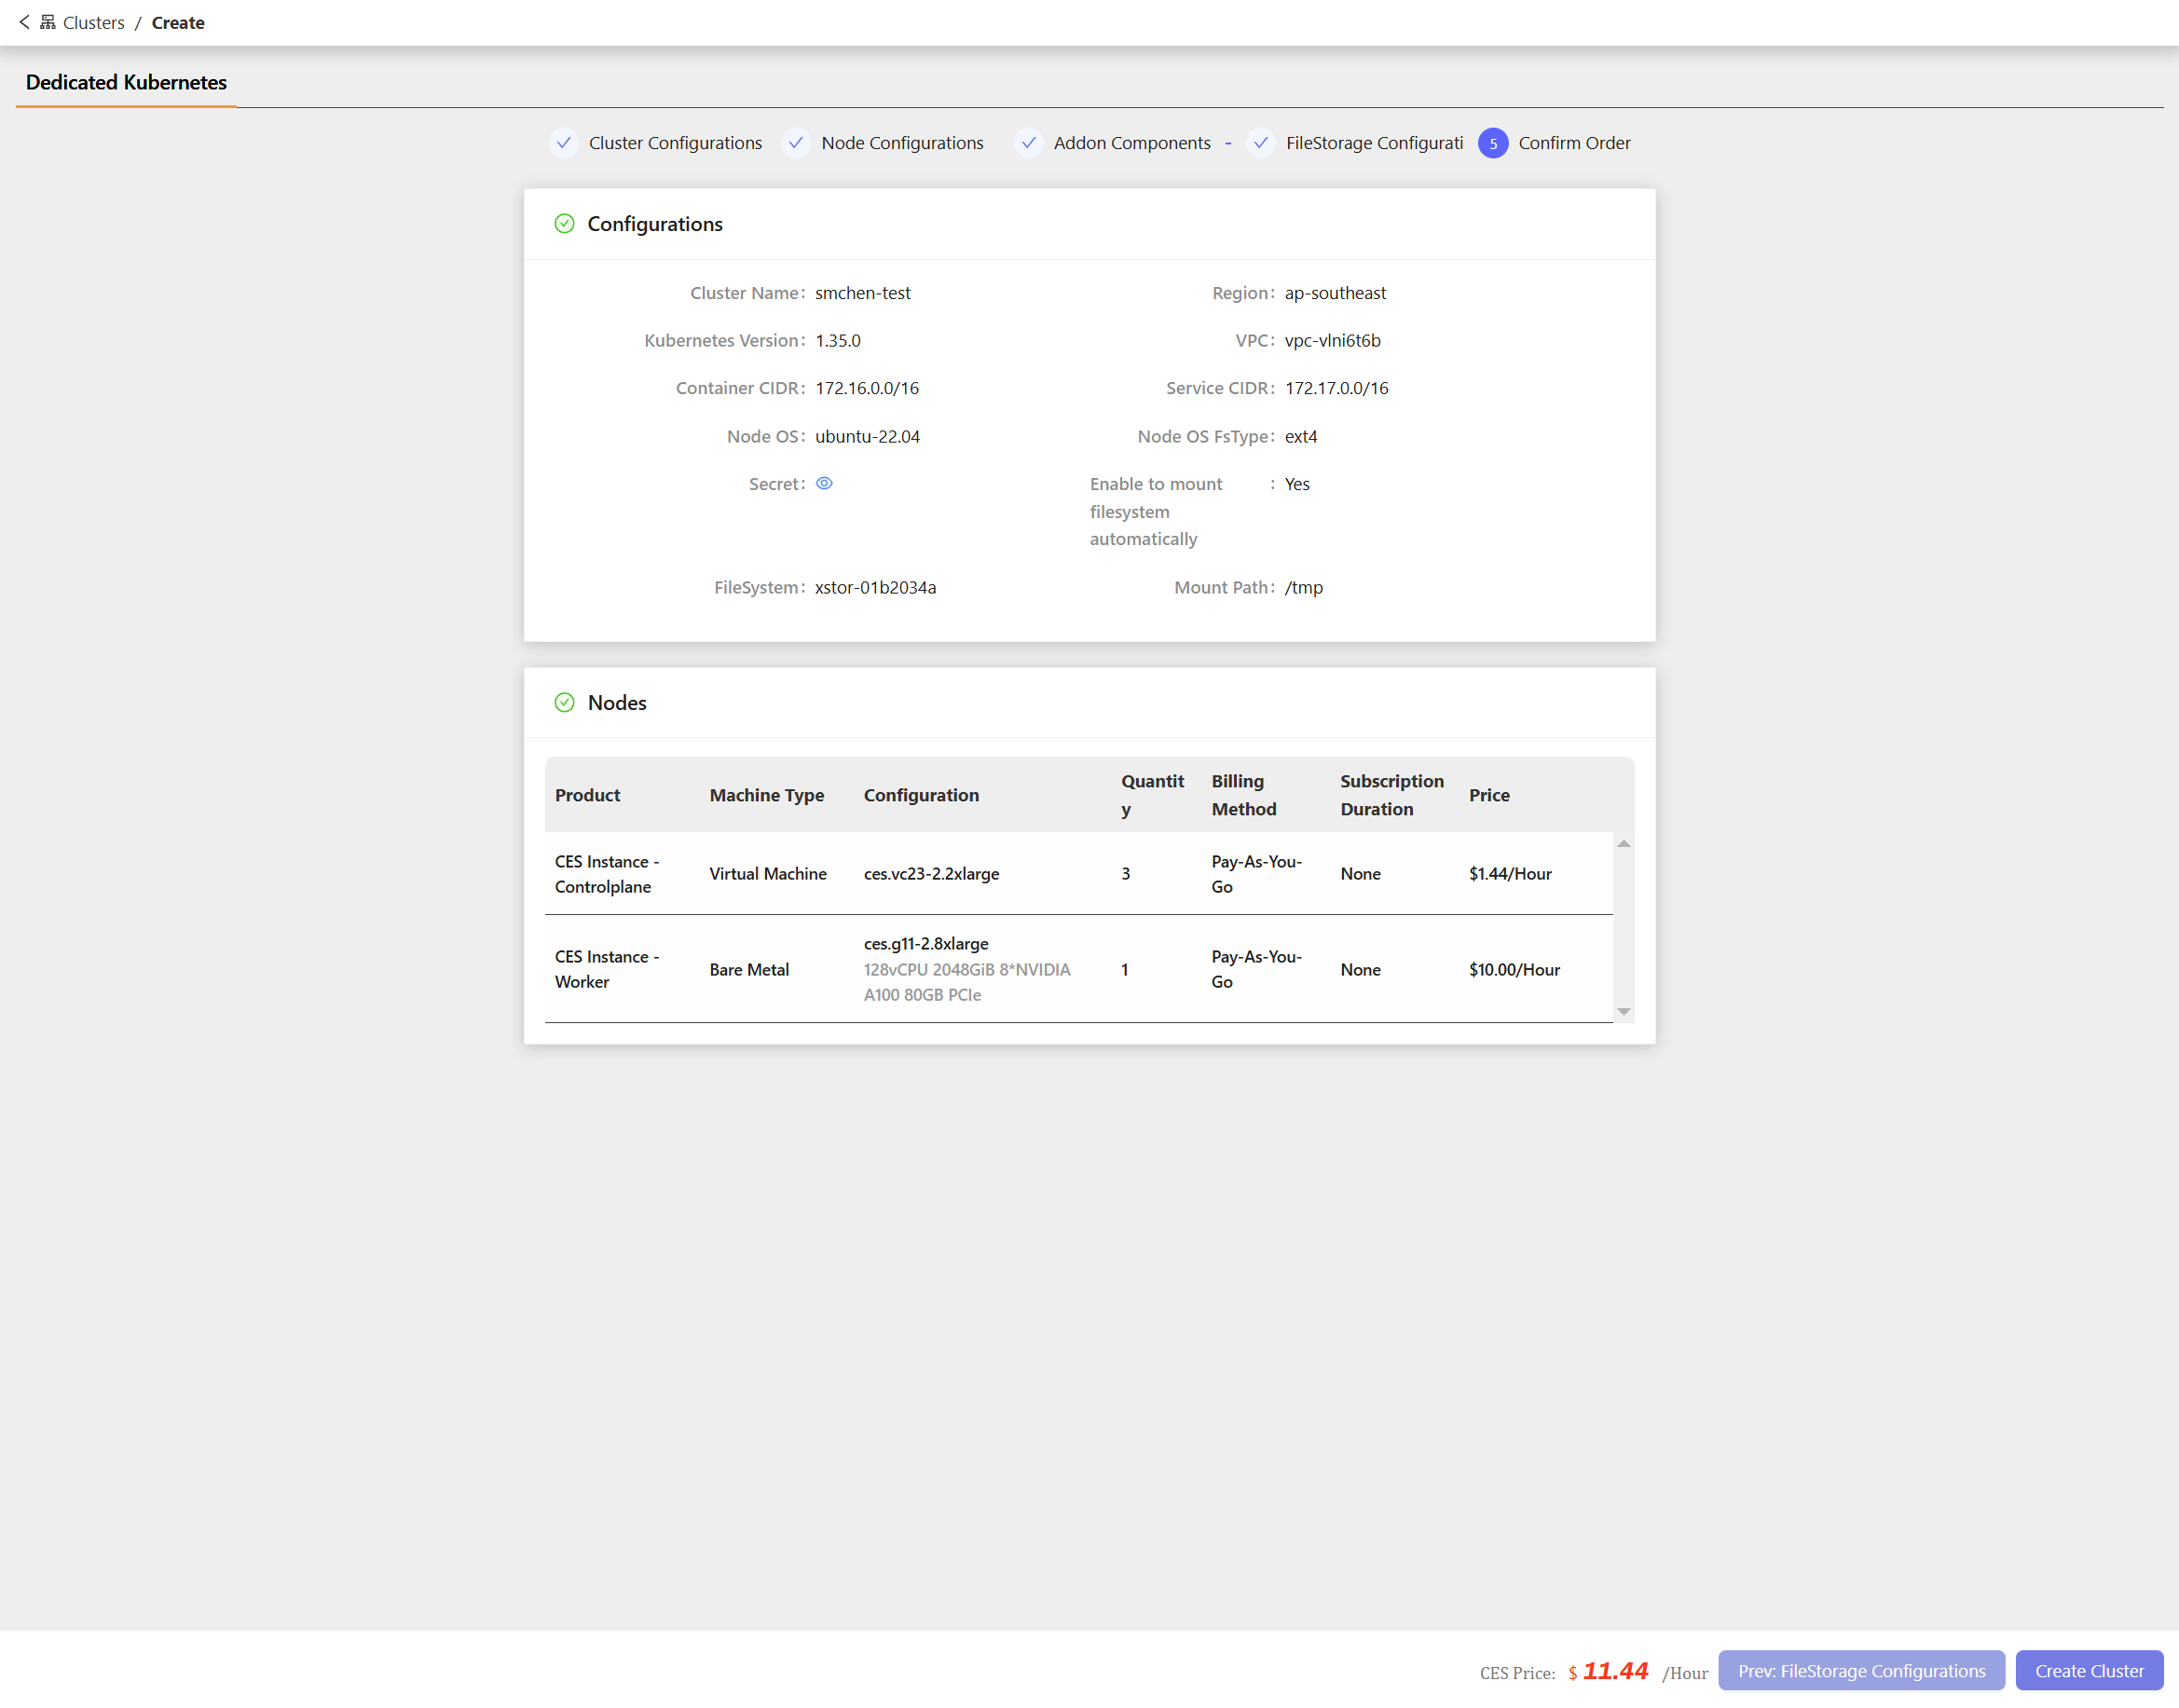
### Step 5: Confirm Order
Review all configured settings before submitting. The confirmation page displays two sections:
**Configurations** — Summary of cluster settings, including:
| Field | Example |
| ---------------------------------------- | ---------------- |
| Cluster Name | `smchen-test` |
| Region | `us-east` |
| Kubernetes Version | `1.35.0` |
| VPC | `vpc-o30jjx2h` |
| Container CIDR | `172.16.0.0/16` |
| Service CIDR | `172.17.0.0/16` |
| Node OS | `ubuntu-22.04` |
| Node OS FsType | `xfs` |
| Enable to mount filesystem automatically | `Yes` |
| FileSystem | `xstor-10bd9db1` |
| Mount Path | `/tmp` |
**Nodes** — Summary of node pricing, including:
| Field | Description |
| --------------------- | -------------------------------------------------------------------- |
| Product | Node role (e.g., CES Instance - Controlplane, CES Instance - Worker) |
| Machine Type | Bare Metal or Virtual Machine |
| Configuration | Instance type and hardware specs |
| Quantity | Number of nodes |
| Billing Method | Pay-As-You-Go or Subscription |
| Subscription Duration | Duration for Subscription billing (None for Pay-As-You-Go) |
| Price | Estimated cost per hour |
## Procedure
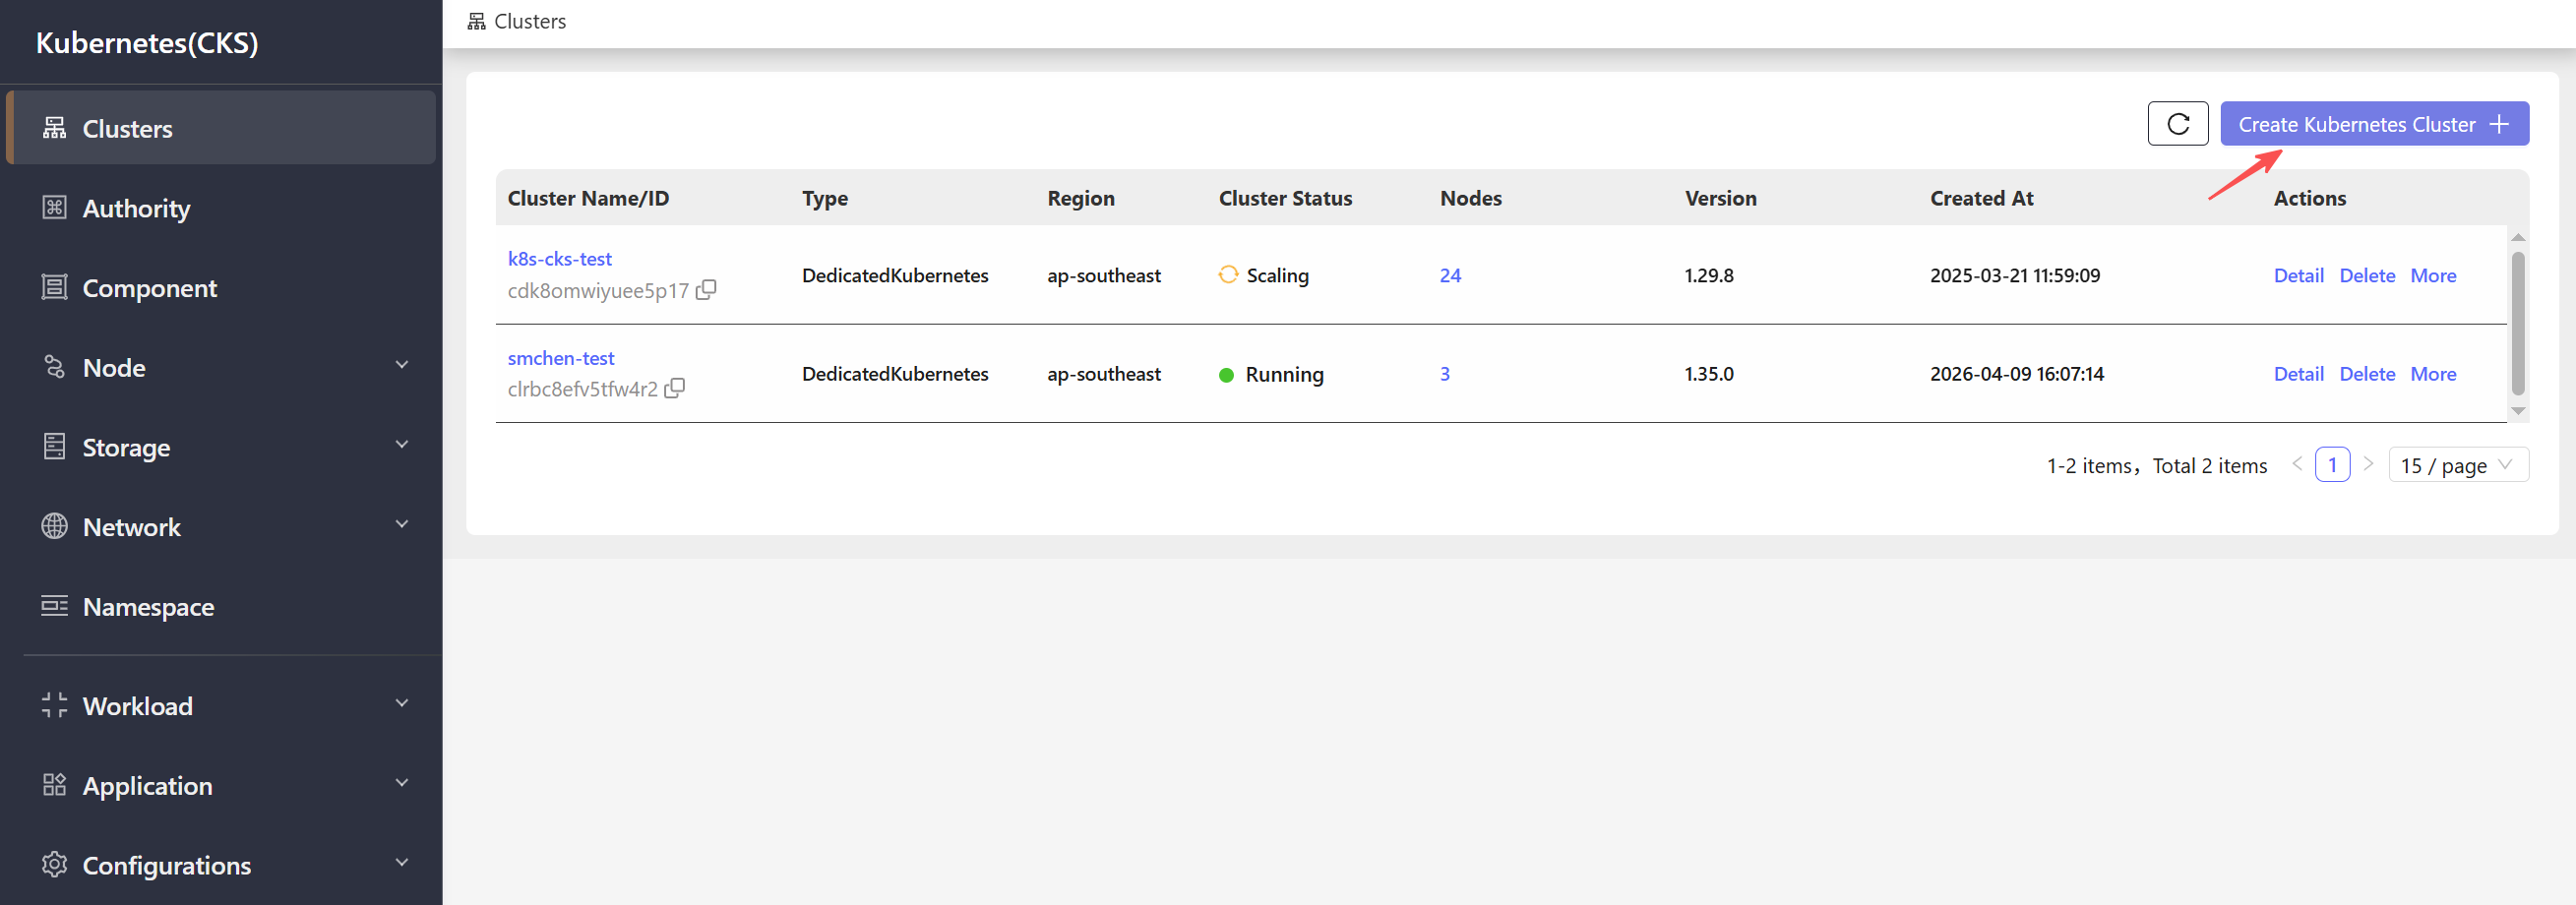
1. Navigate to the **Container Service > Kubernetes (CKS)** management console.
2. On the cluster list page, click **Create Kubernetes Cluster** in the upper right corner.
 3. **Step 1 – Cluster Configurations**: Configure the cluster name, region, Kubernetes version, VPC, network settings, and node OS. Then click **Next: Node Configurations**.
 4. **Step 2 – Node Configurations**: Configure the control plane and worker node pool settings, including instance types, node quantity, and GPU driver options. Then click **Next: Addon Components**.
 5. **Step 3 – Addon Components**: Select the optional add-on components to install on the cluster (e.g., monitoring, GPU plugins, workflow engines). Then click **Next: FileStorage Configuration**.
 6. **Step 4 – FileStorage Configuration**: Optionally enable automatic filesystem mounting and configure the filesystem and mount path. Then click **Next: Confirm Order**.
 7. **Step 5 – Confirm Order**: Review the cluster configuration summary and node pricing details. Once confirmed, click **Create Cluster**.
 ## Expected result
Cluster provisioning typically takes several minutes. Monitor the cluster list for status updates. Creation is complete when the cluster status changes to `Running`.
## Expected result
Cluster provisioning typically takes several minutes. Monitor the cluster list for status updates. Creation is complete when the cluster status changes to `Running`.